Introduction
Thank you for purchasing our theme. The purpose of this documentation is to help you make the most of what this theme has to offer. We've covered almost everything needed to start using our theme, we tried to keep it as simple as possible. If you have any questions that are beyond the scope of this help file, please feel free to email us from our Profile Page. Please don’t forget to mention your purchase code in your message.
We would happily welcome feedback from you on how, if anywhere, you would like this documentation improved. If you would find anything a little bit easier and more helpful if we went into more detail, or explained something a little better - we'd be happy to hear it.
Getting Started
To install Uno theme you must have a working version of WordPress already installed. If you need help installing WordPress, please follow the instructions in WordPress Codex.
If you are new to WordPress, I recommend you to check some useful resources on how setup and use WordPress:
- WordPress Codex – General info about WordPress and how to install it on your server.
- First Steps With WordPress – General info about multiple topics on WordPress.
- FAQ New To WordPress – The most popular FAQ’s regarding WordPress.
To use the Uno theme you need a WordPress installation from WordPress.org running on your own web server. Or you will need a WordPress.com site with the Business plan.
For the WordPress.com please note that themes only work on WordPress.com sites if you are on the Business plan. If you have the Free, Personal or Premium plan, WordPress.com does not allow you to install custom themes and plugins.
Server Requirements
To use Uno WordPress Theme your server must meet the following requirements:
- Server must be running WordPress 5.6.0 or higher. It’s recommended to always use the latest version of WordPress.
- Server must support PHP 7.4.0 or higher.
- You should have an active database in MySQL 5 or higher.
- You need to have FTP access to your website hosting or credentials to your hosting panel.
PHP Requirements
Many issues you may run into such as: white screen, demo content fails when importing, empty page content, theme not being saved and other similar issues are all related to low PHP configuration limits. The solution is to increase the PHP limits. You can do this on your own, or contact your hosting provider and ask them to increase those limits to a minimum of the following:
                    memory_limit = 258M

                    upload_max_filesize = 32M

                    post_max_size = 32M

                    max_execution_time = 300

                    max_input_time = 60

                    max_input_vars = 5000
First Steps
After you’ve made a purchase on Themeforest, you’ll need to download theme files from your Themeforest Account. To do this, simply navigate to Downloads tab and find purchased item Uno - Creative Photography WordPress Theme.
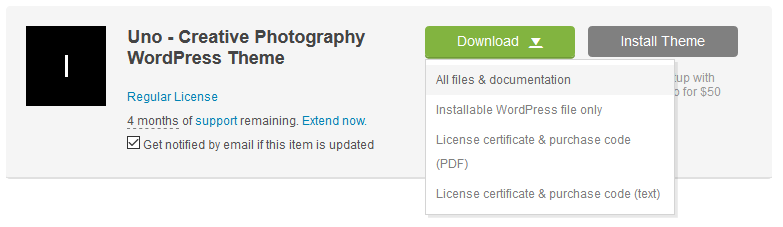
All Files & Documentation
- uno.zip – main theme file. You can install it through WordPress admin panel. If you install it via FTP then unzip it first and use the extracted folder.
- uno-child.zip – child theme. For advanced users who are about to make code changes.
- Documentation – folder with the user guide.
- Licensing – all the legal information.
Installable WordPress file only
- uno.zip – main theme file. You can install it through WordPress admin panel. If you install it via FTP then unzip it first and use the extracted folder.
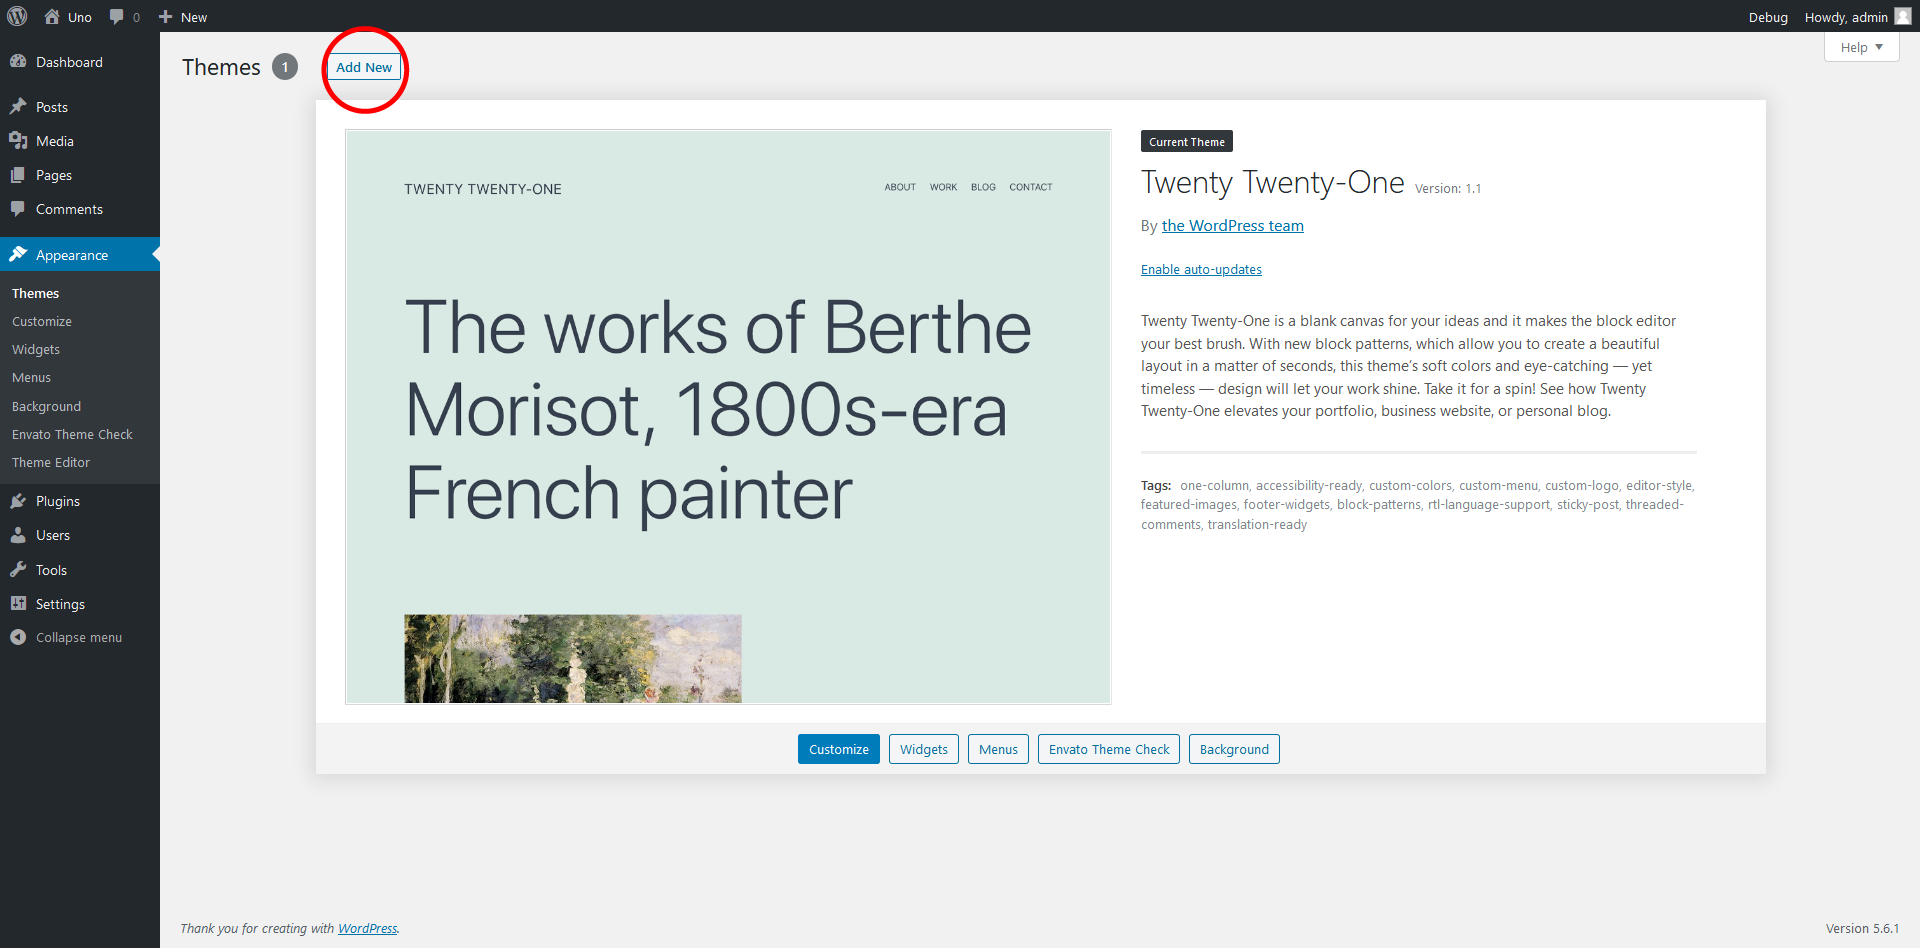
Installing Theme
There are 2 ways on how you can install WordPress themes – using WordPress theme installer or using FTP upload. The first method is probably the simplest installation method for most users.
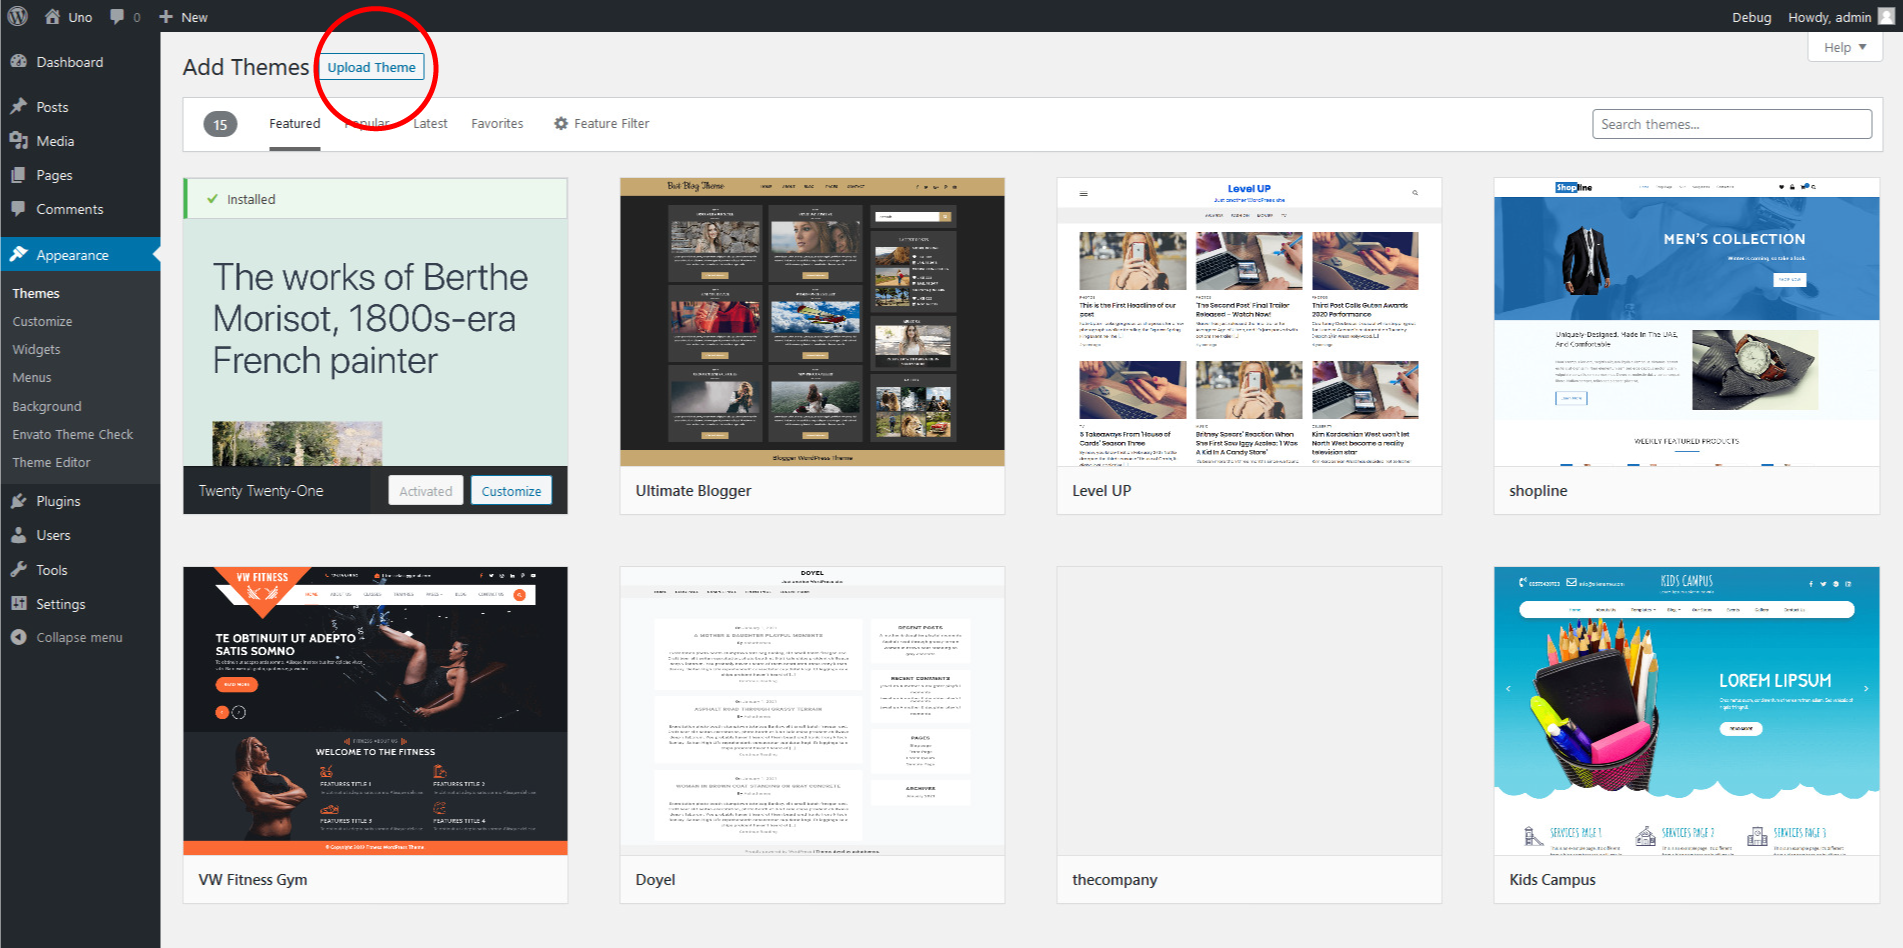
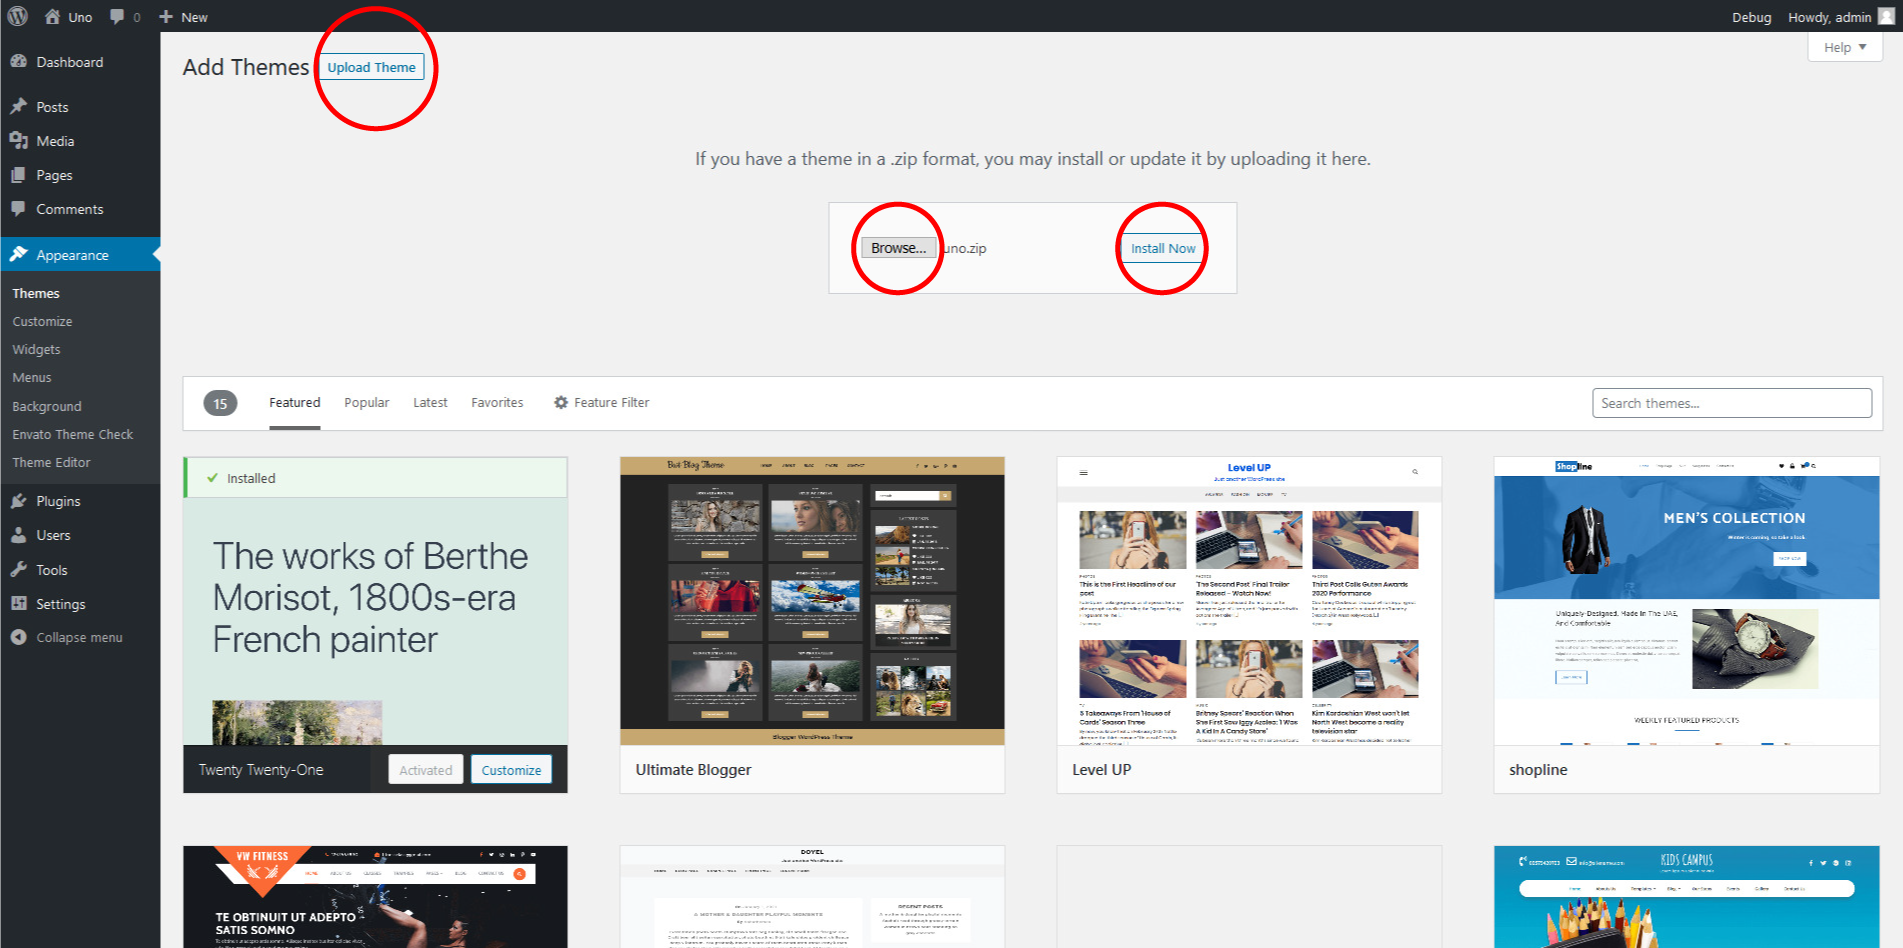
Installing via the WordPress theme installer
- From the dashboard go to Appearance → Themes → Add New → Upload Theme
- Click on "Choose File" and select dos.zip
- Click on "Install Now"
Installing via FTP
This is a more advanced way to install your theme. To install Uno via FTP
- Download the "Installable WordPress Theme only" and extract the zip file. You should get a folder named Uno.
- Using any FTP client (We recommend Filezilla ), log-in to the server where your WordPress website is hosted.
- navigate to wp-content/themes/ folder under your WordPress website’s root directory.
- Upload the folder you’ve extracted on the first step into wp-content/themes/
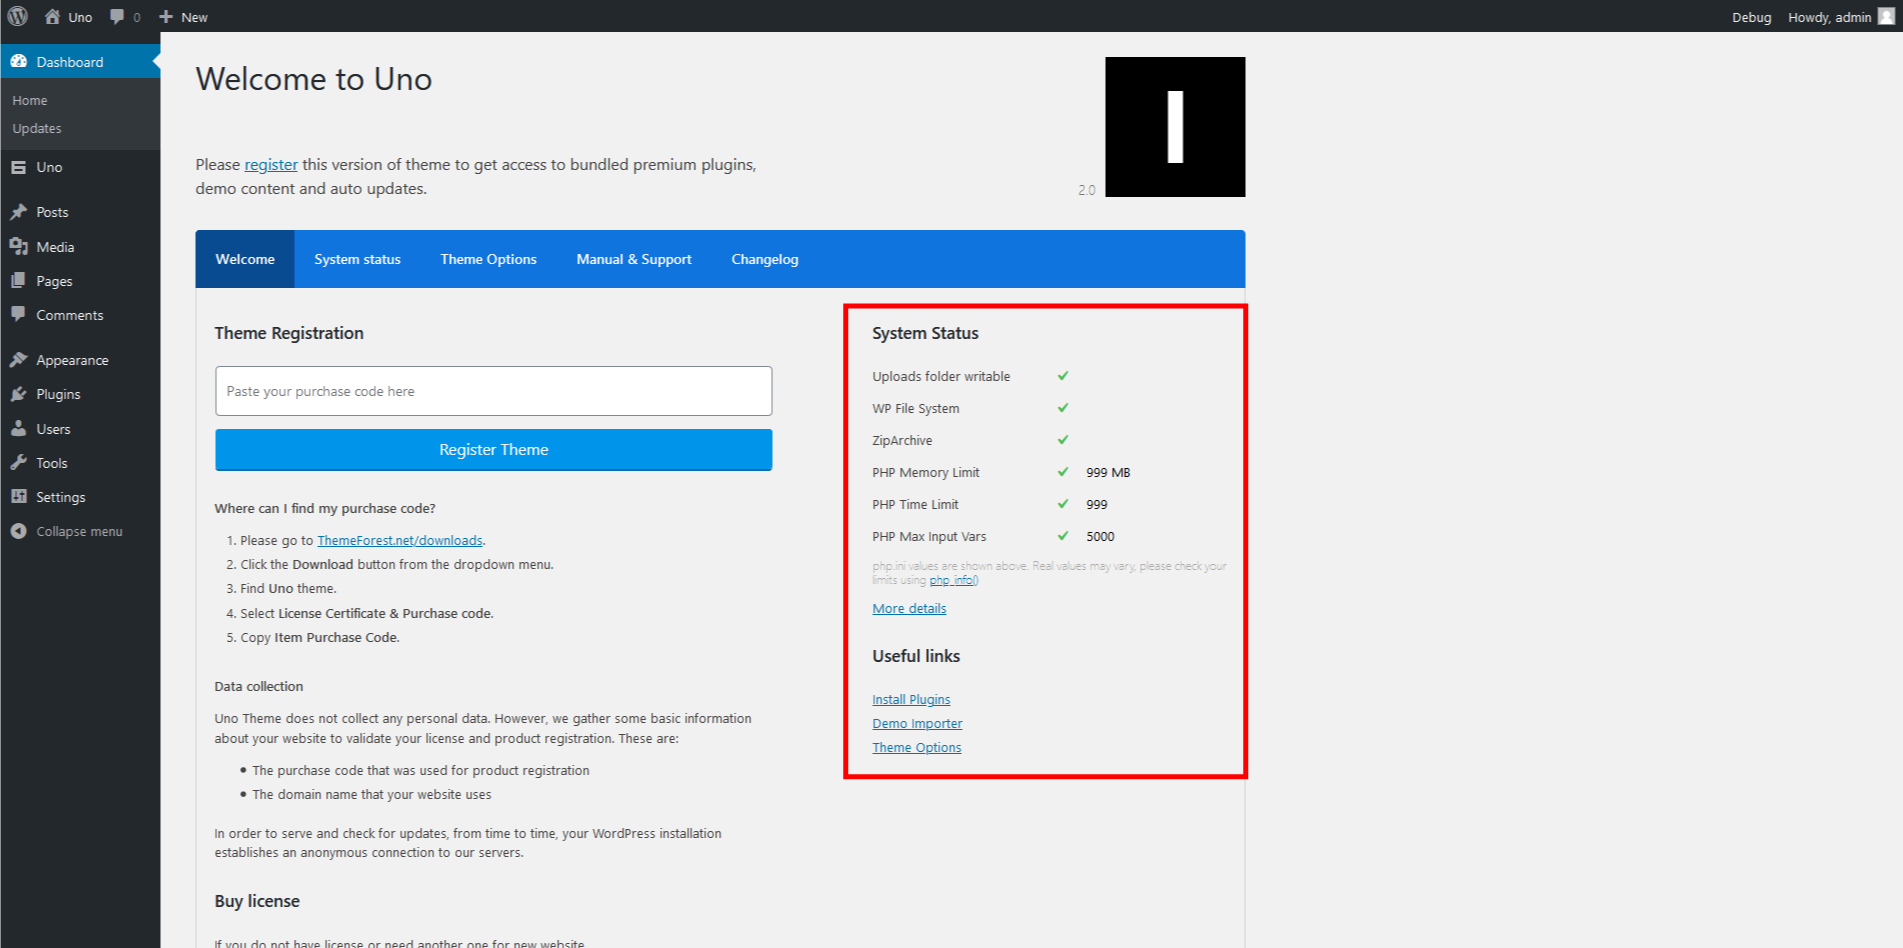
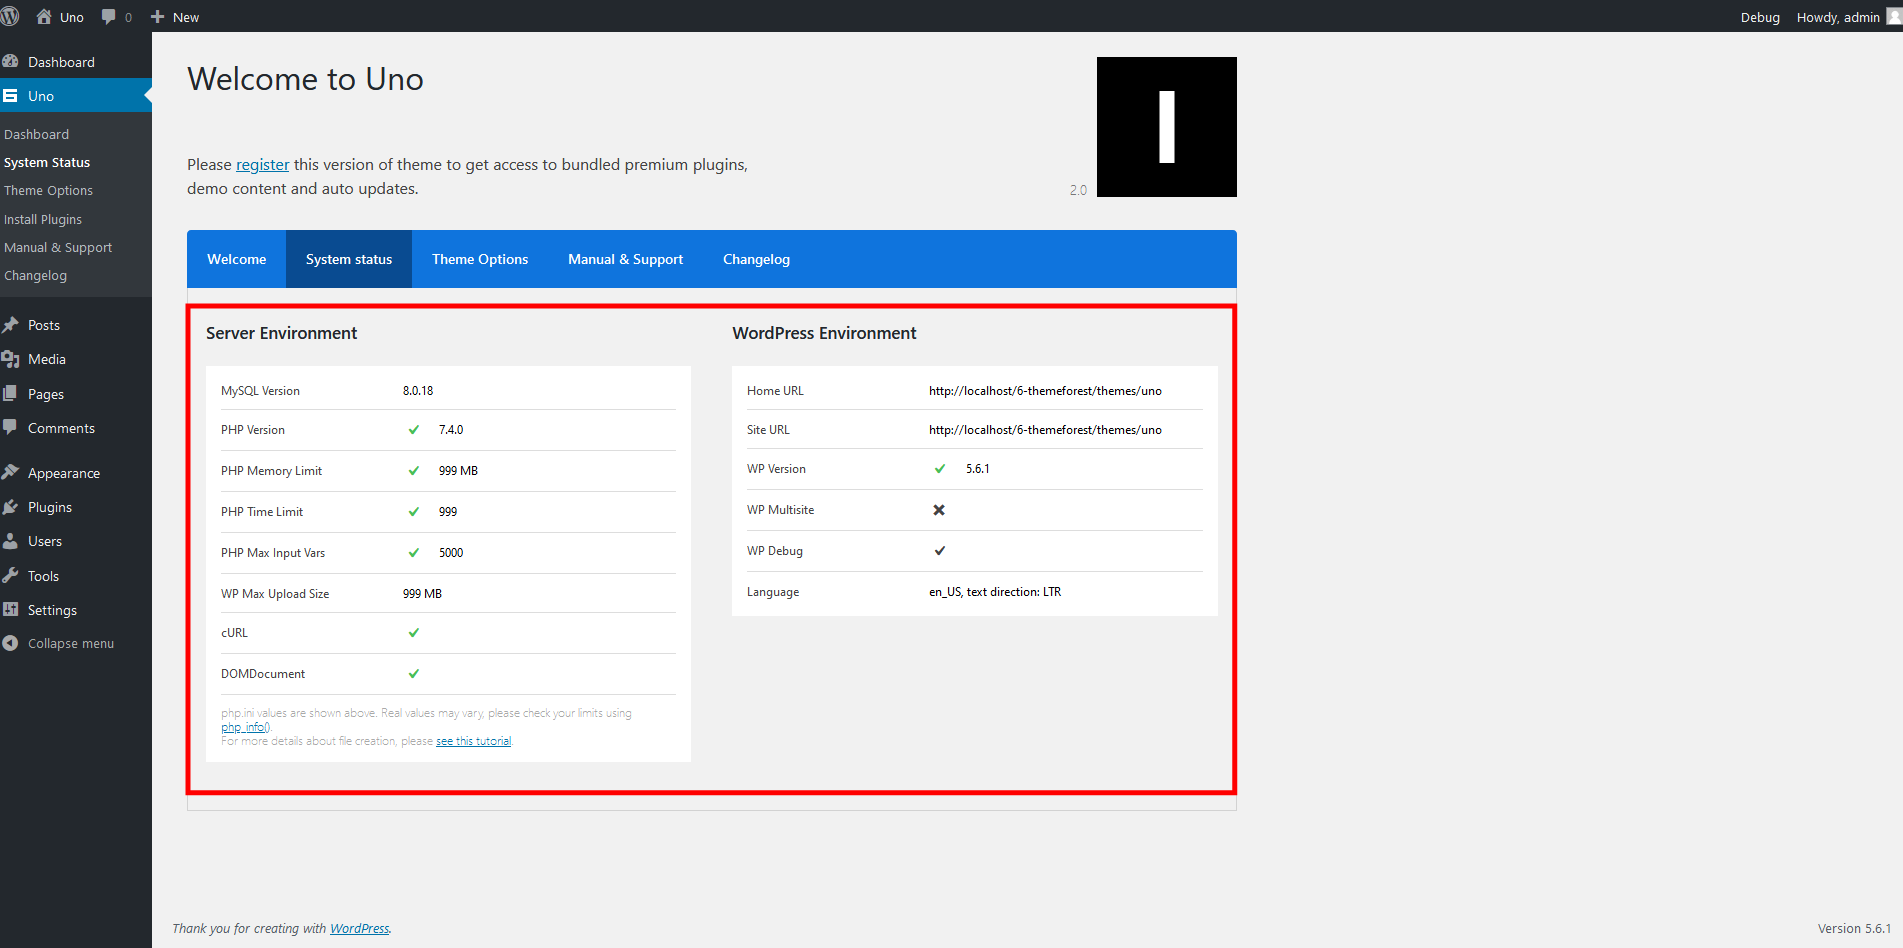
System Status
Under the System Status also under Welcome Screen, you will find the system status information for your installation. If you have ‘red errors’ indicating problems are present, it is likely you are not in compliance with the Server Requirements for a modern WordPress installation.
Please consider that Uno as any other Premium themes packed with page builder and full options set needs decent server performances to run smoothly. Any 'red error' has a link that points to a tutorial showing how to fix the value to meet the requirements.
You can always contact your host to have them adjusted as needed. Please note though that many hosts will try to keep the limits low to save their resources. You are paying for it, however, and you should expect to be getting your money’s worth. These values are typically lower if you choose a low budget host.
The most important values you need to be compliant are:
- Memory Limit: the WordPress Memory Limit is the maximum amount of memory (RAM) that your site can use at one time. When you reach your Memory Limit, you’ll encounter a fatal error.
- Max Input Vars: the PHP Max Input Vars is the maximum number of variables your server can use. If the value is too low, you may experience problems such as lost data within your Theme Options and disappearing widgets.
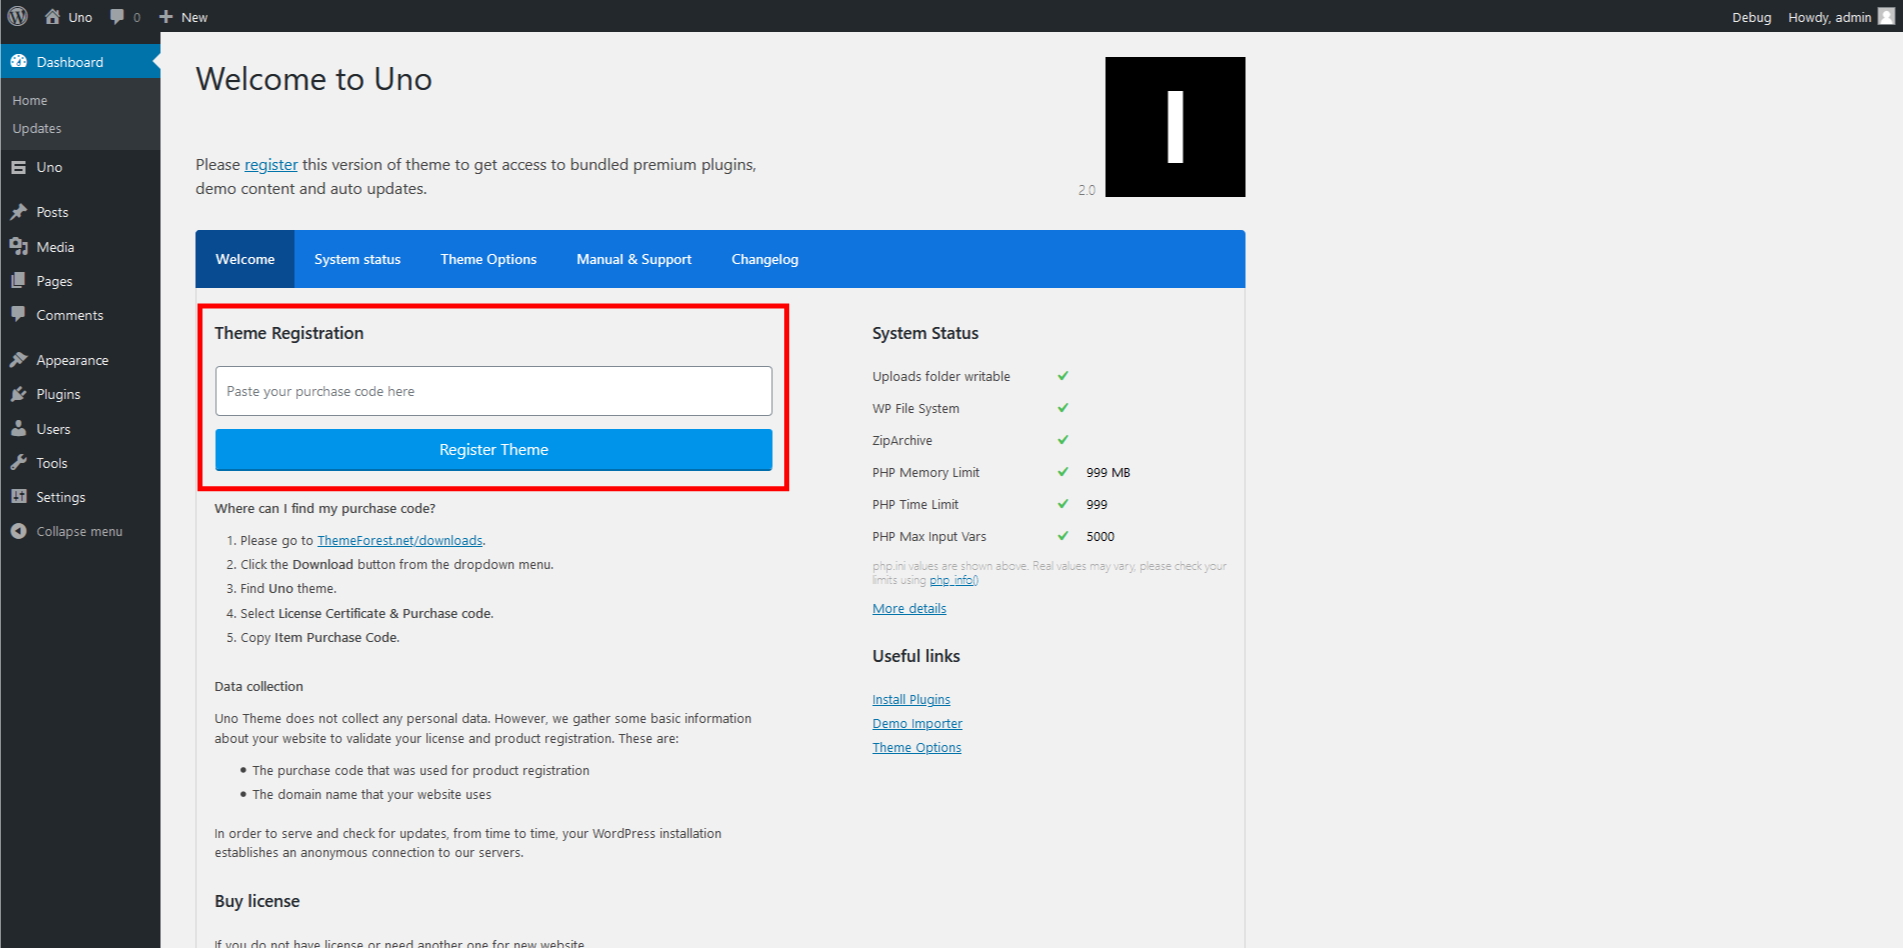
Theme Registration
To register your product, navigate to Uno → Dashboard and look for the Product Registration section. To complete the registration, you’ll need the Envato Purchase Code.
Purchase code can only be used on 1 WordPress Installation. So if you are planning to move your website to a new location or a new server, make sure you deregister the theme fist.
Where can I find my Purchase Code?
To download your Purchase Code simply follow these steps:
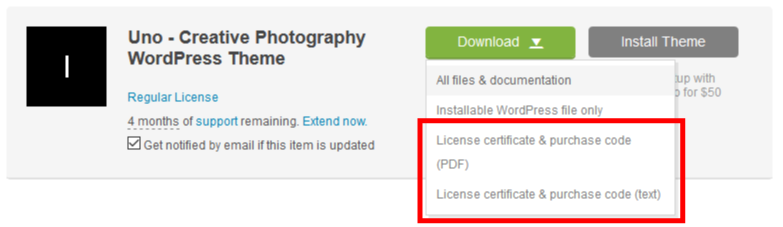
- Access your ThemeForest downloads with the account that was used to purchase Uno.
- Look for Uno in your list of purchases, click the Download button and select 'License Certificate & Purchase Code'.
- Copy the 'Item Purchase Code' into the field 'Envato Purchase Code' of the Dashboard page.
ThemeForest offers a single license and an extended license.
The single license means that you need to purchase one single license for every site that use the theme. Running multiple websites on a single license is a copyright violation. In other words it is a serious legal offence and is strictly prohibited.
So if you are building 3 websites with Uno, then you are required to purchase 3 single licenses. Even the extended license operates this way but you can re-sell this as an end product.
Theme Migration
If you want to move your website to a new location or a new server, make sure you do the following:
- Disable all plugins.
- Deregister the theme from "Dashboard" tab.
- We suggest using the Duplicator plugin to move your project. It will copy the whole website with the database. It is also an excellent way of storing a copy of your site if anything terrible would happen to it in the future.
- When the transfer of your website has finished, please enable your plugins and register the theme again.
Installing Plugins
Uno theme requires a set of core and additional plugins to function correctly. A plugin is an additional component that offers functionality and features beyond a typical WordPress installation. Without them, most of its functionality is not available. After installing the theme you will be prompted to install the required plugins at the top of your dashboard. Alternatively, you can:
- From the dashboard go to Uno → Install Plugins
- Toggle all the required plugins and click "Install"
- Toggle all the required plugins and click "Activate"

Importing Demo Data
The easiest way to import our demo content is to use the Demo Importer. The Demo Importer provides you with all of Uno's pages and posts, portfolios, widgets, theme options, assigned pages, menus, and more.
Using this import feature is recommended for fresh installs. The automatic import will NOT replace existing content but it will merge your actual contents with Uno demo contents. We always recommend running it on a fresh WordPress installation and no extra plugins active.
Demo Import
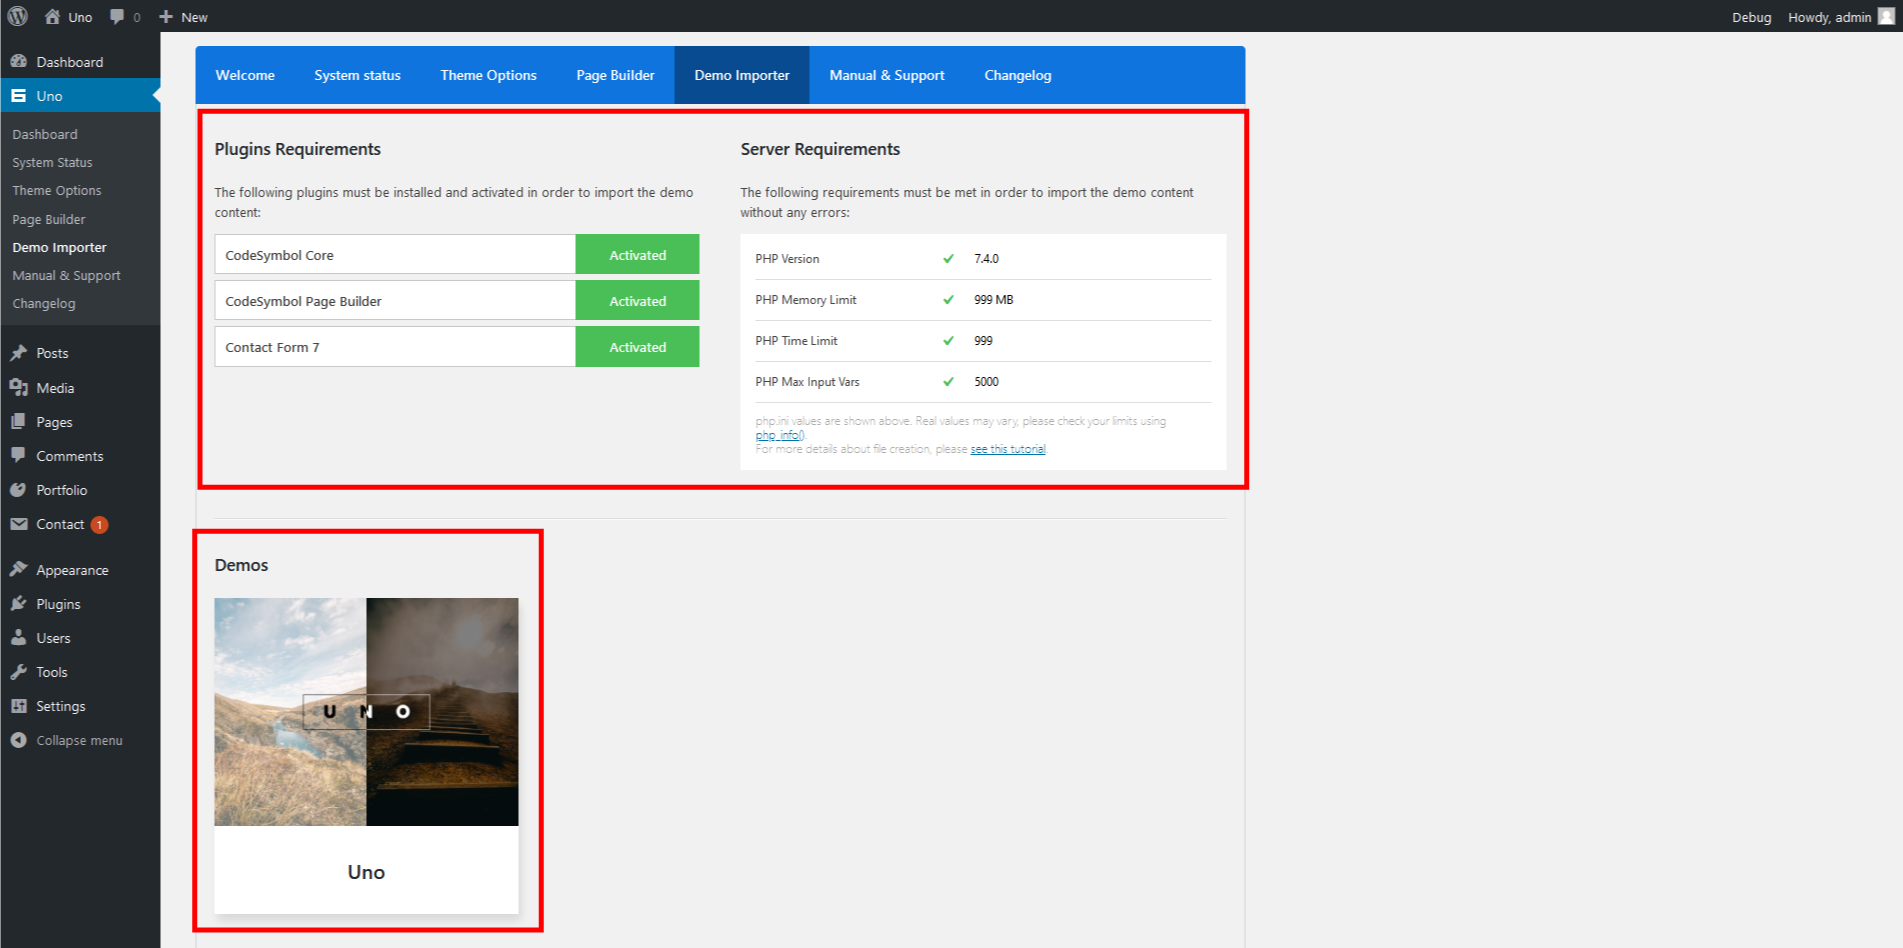
- Check the System Status to ensure your server meets the requirements for a successful import. You must meet the server requirements and have all plugins bundeled with the theme activated, or the demo won't work.
- Navigate to Uno → Demo Importer
- Click on "Uno" demo.
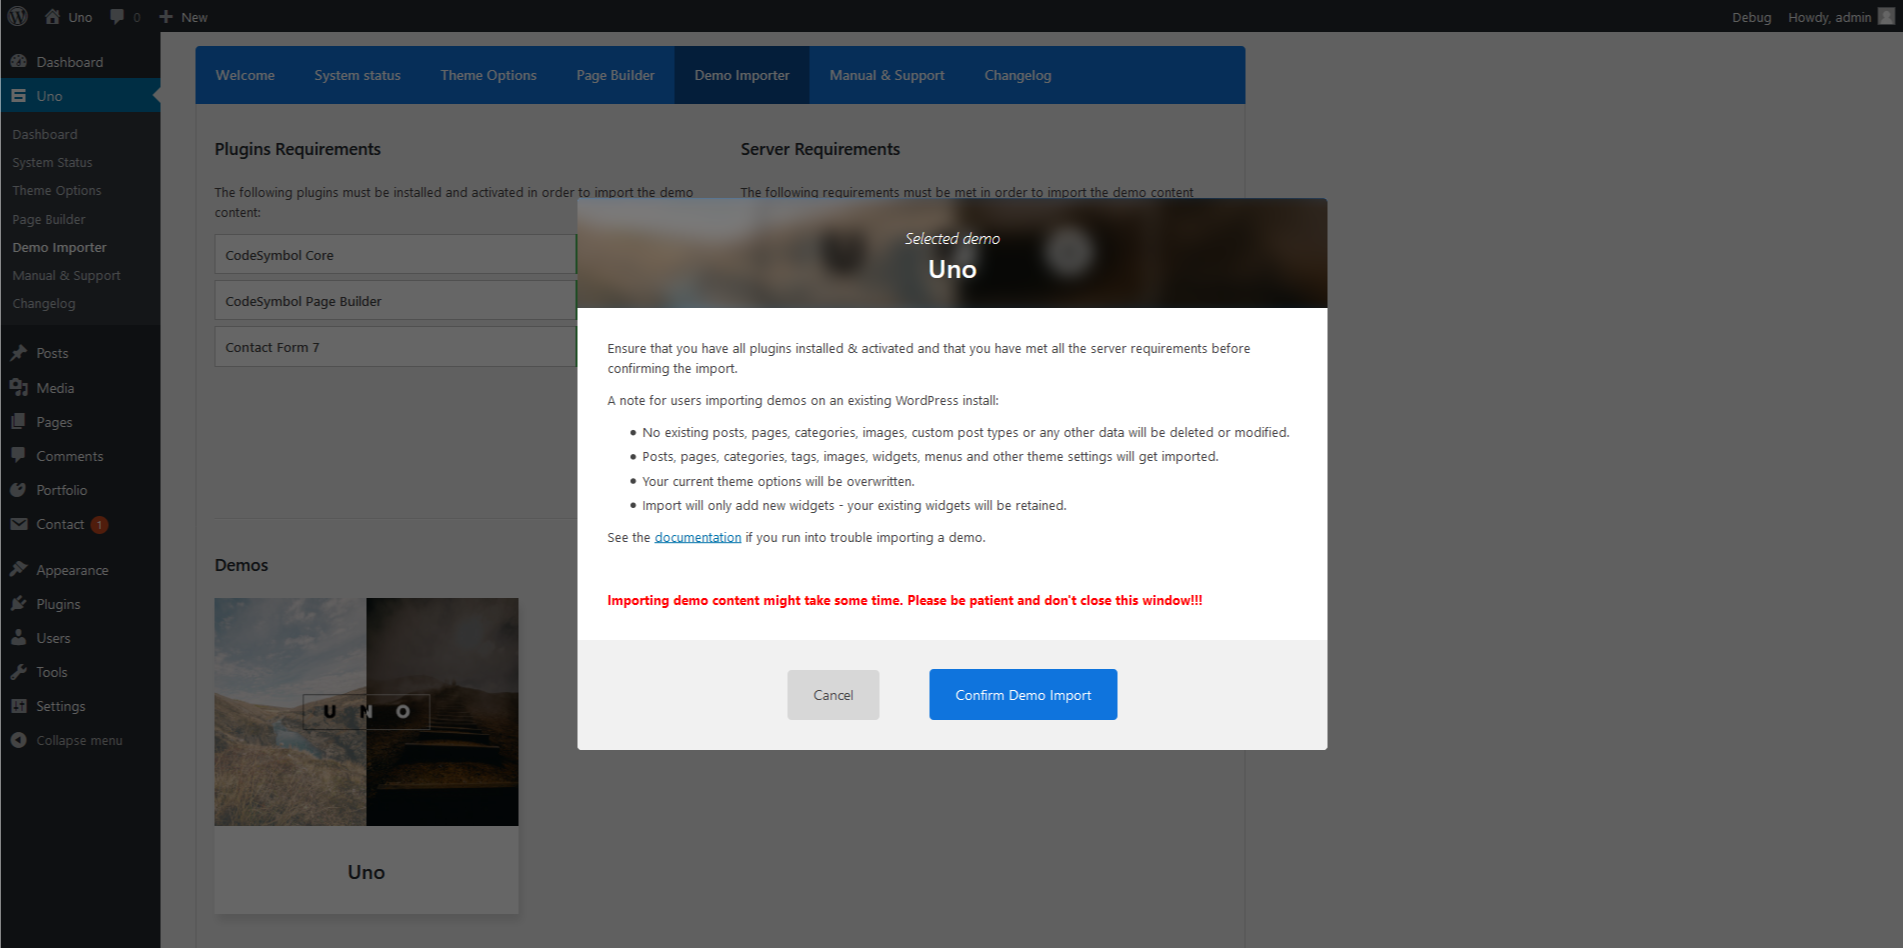
- Click on 'Confirm demo import'.
- Wait until the import routine is done. Please be patient and don't navigate away, as this can take a few minutes depending on your host’s performance.
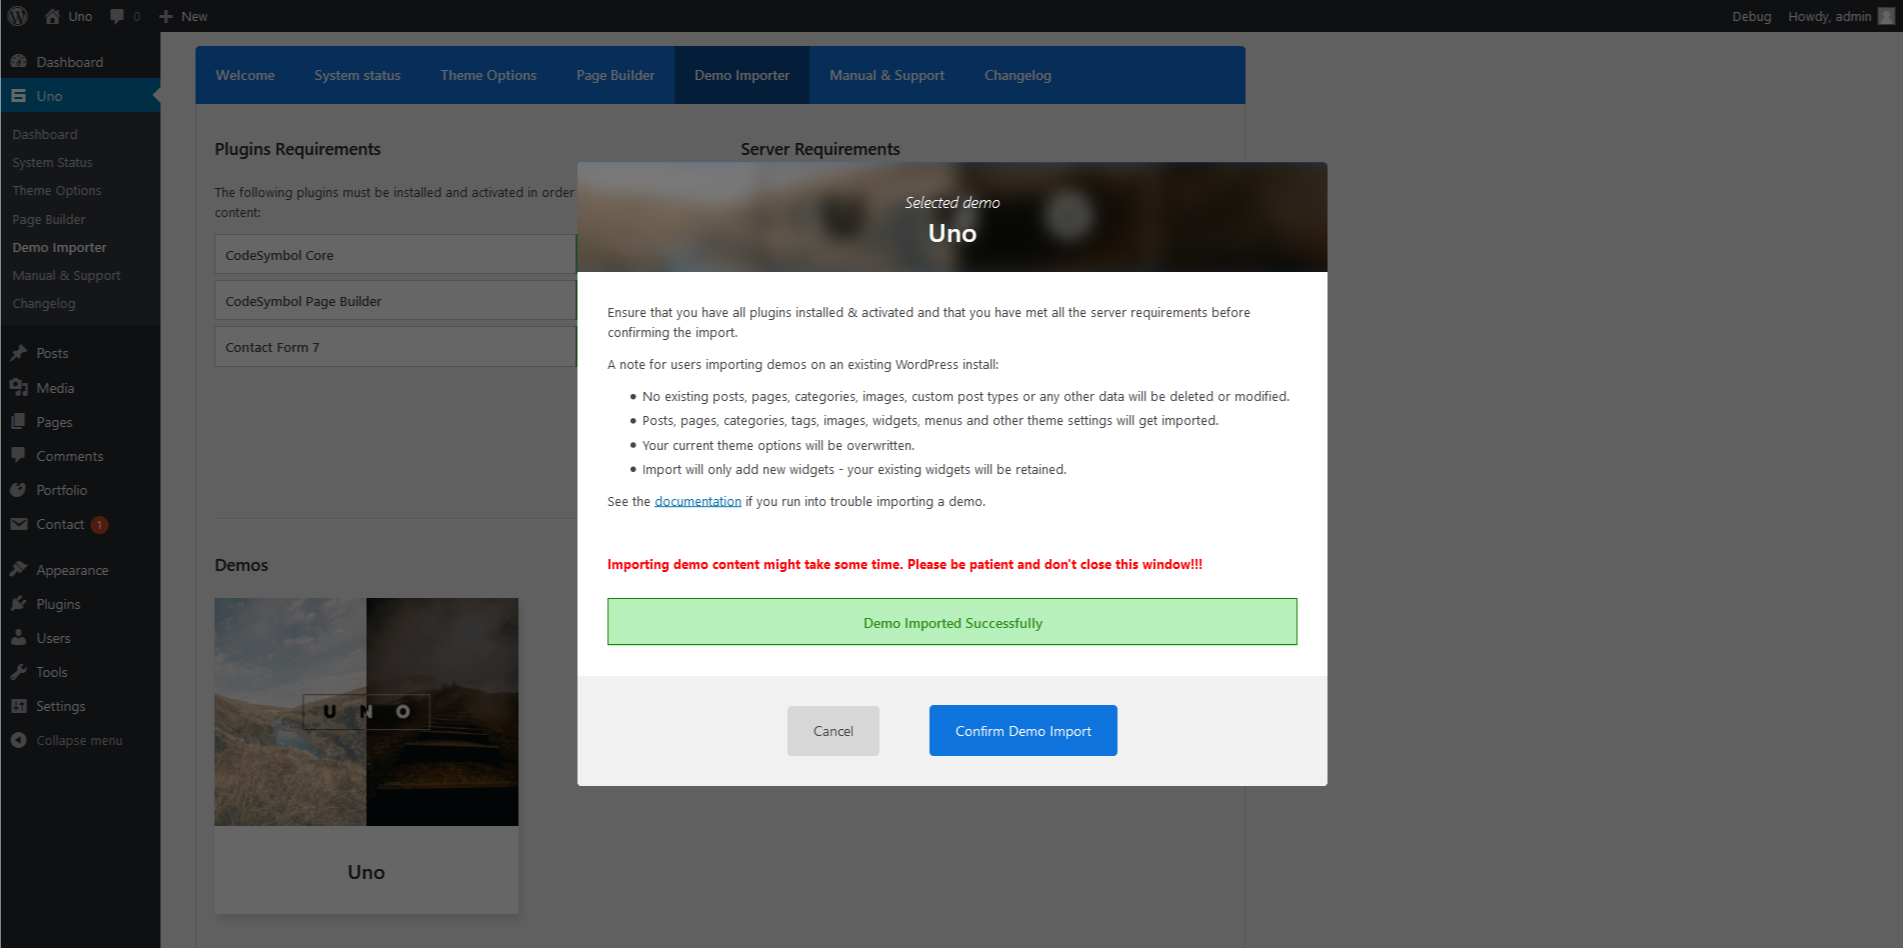
- Once the import is completed, you'll be notified and the import window will close.
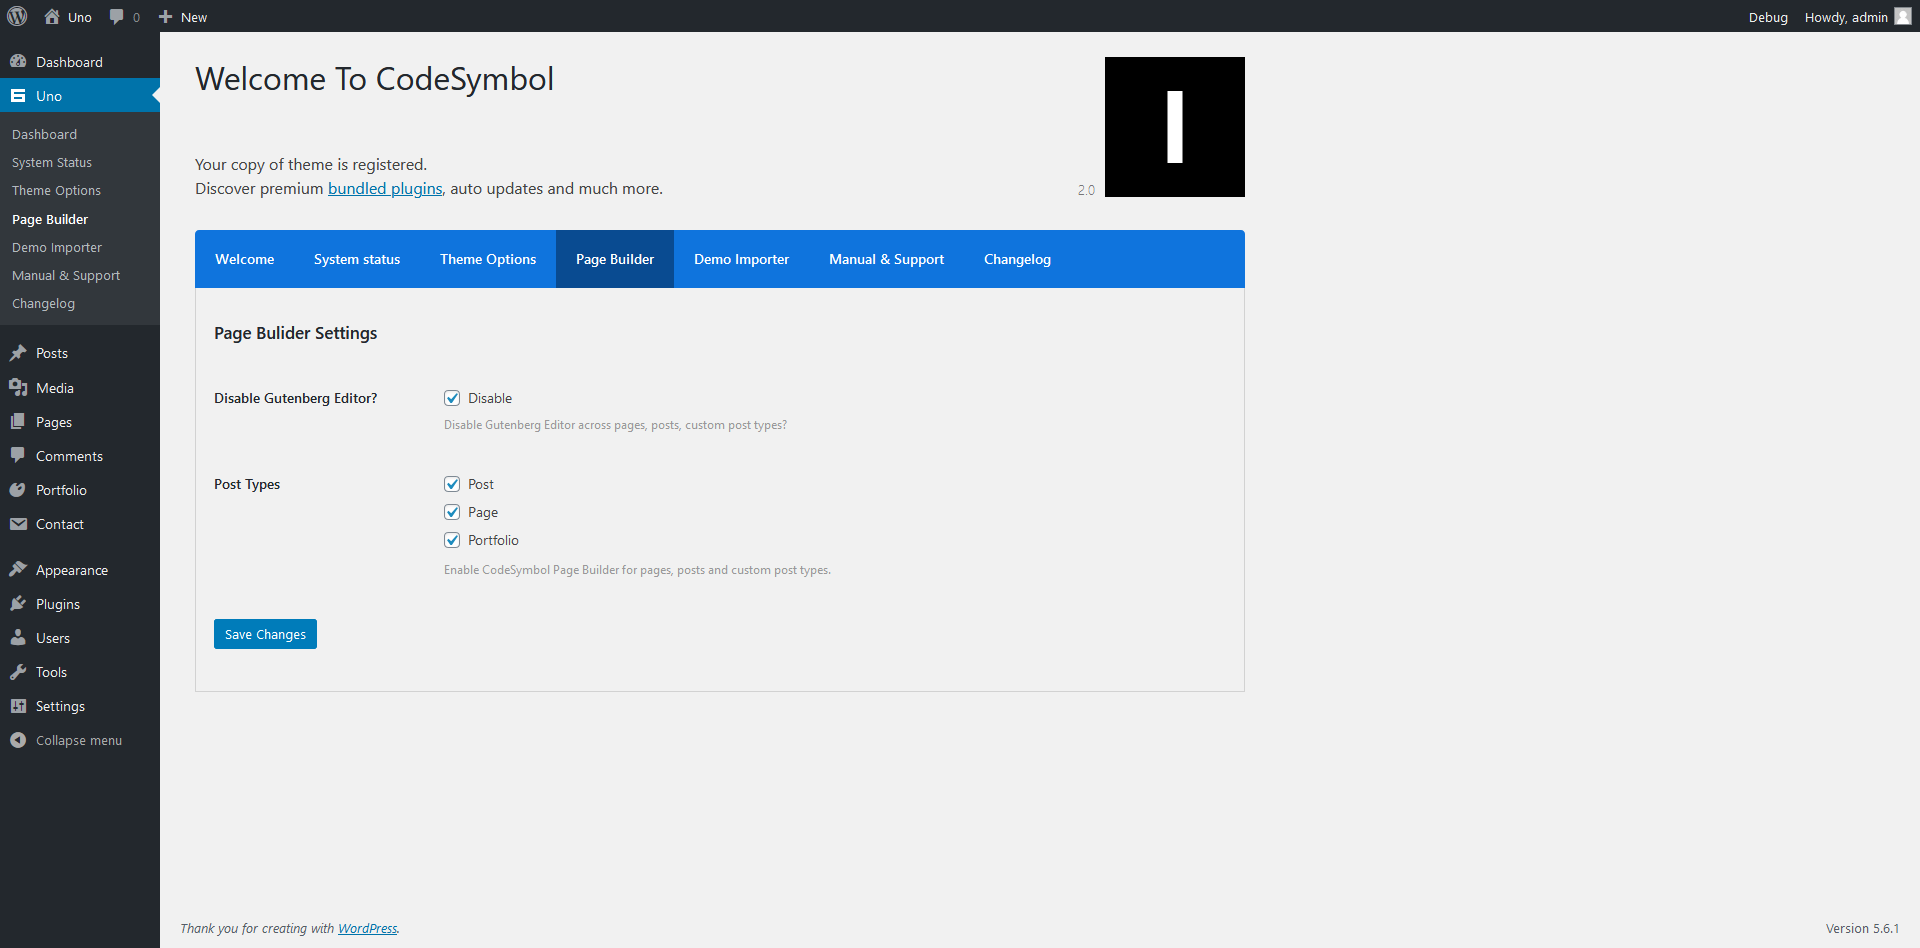
Setting Page Builder
Setting the page builder should be easy, just make sure you have "CodeSymbol Page Builder" plugin installed and active.
Navigate to Uno -> Page Builder, then make sure to enable the builder for the post types you want to use it in. You can also disable Gutenberg editor if you want to set the builder as the default editor.
Setting a Homepage
If you’re new to WordPress you might be wondering why even after importing a demo your website home page is still displaying your blog posts. This is because by default WordPress shows your blog as the home, to change that head over to the Settings → Reading section in your WordPress Admin dashboard.
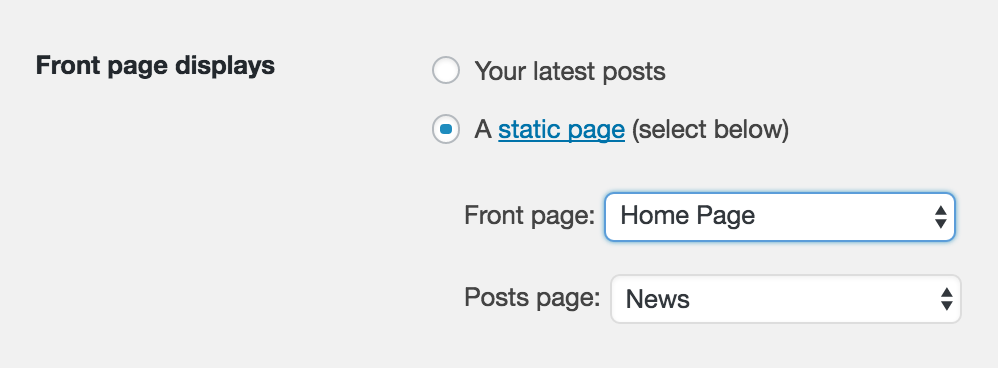
On this page select A Static Page option for Front Page Displays. You'll then see dropdown selects for both the Front Page and the Posts Page. Select your desired pages for each – the one selected for the front page will display as your website home page.
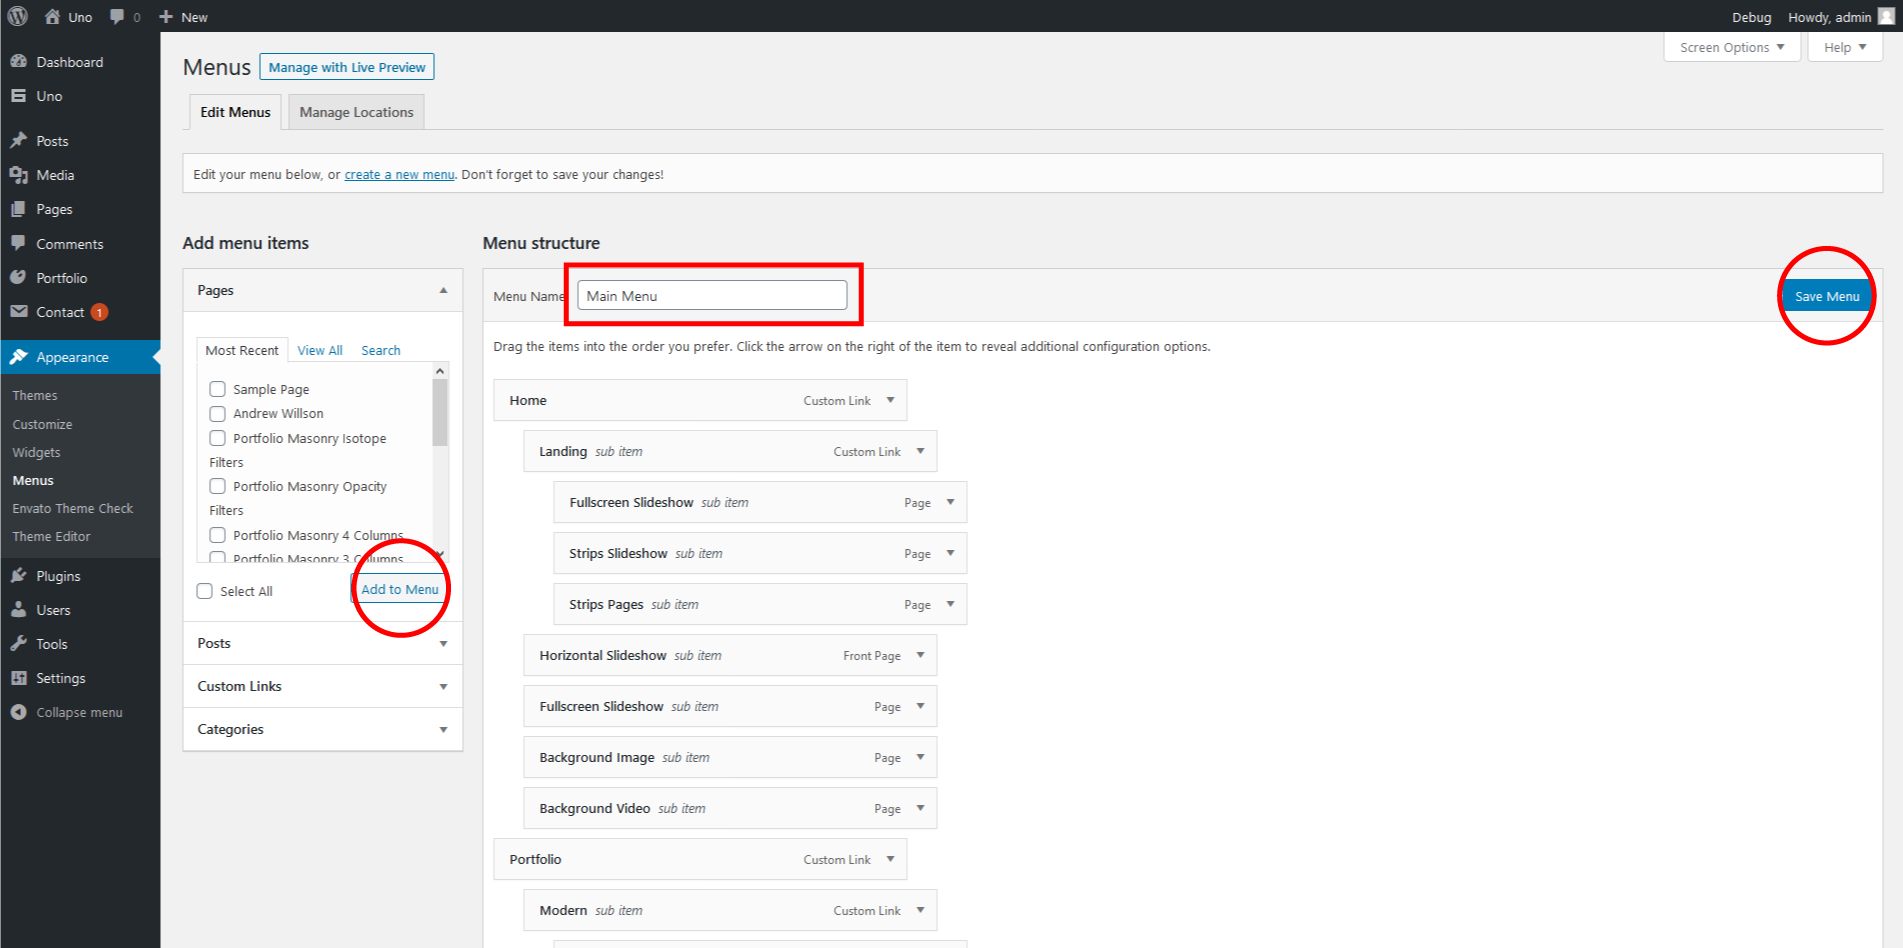
Creating a Menu
To create a menu for your site, do the following:
- Navigate to Appearance → Menus
- The left section contains all pages, posts and portfolio projects. You can also create custom links if you want.
- Set Display location in Menu Settings as Main Navigation Menu
- Click on 'Save Menu' button
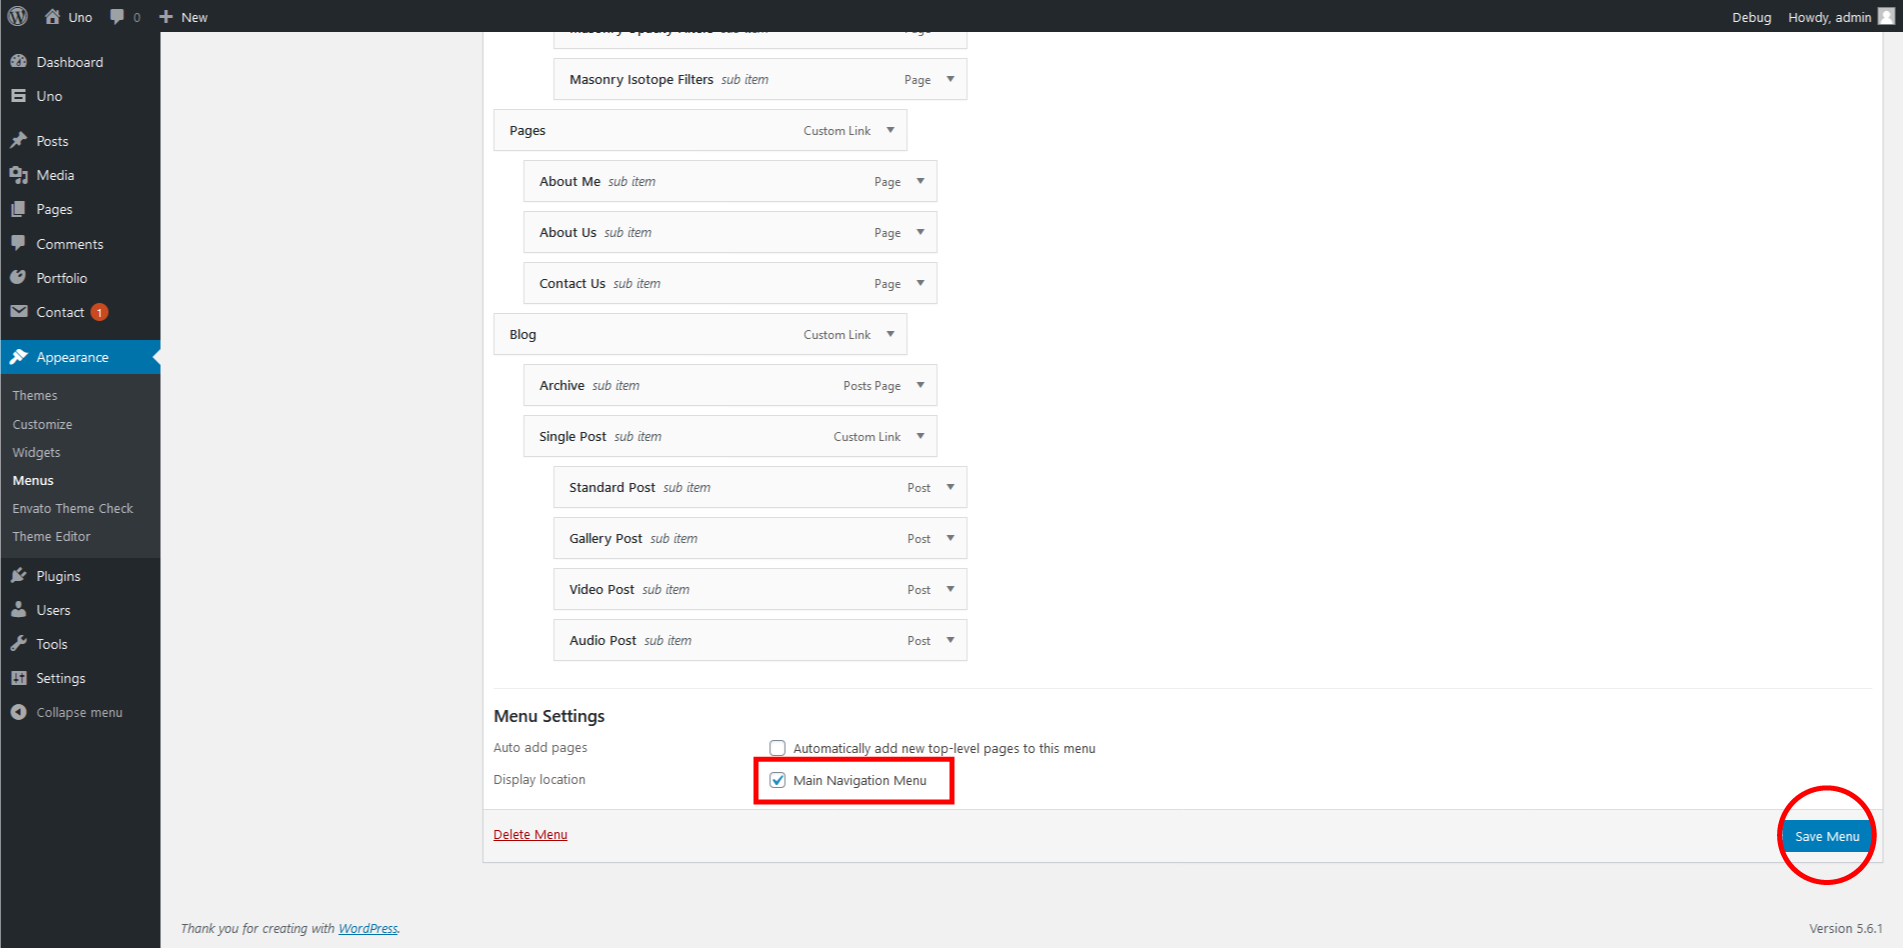
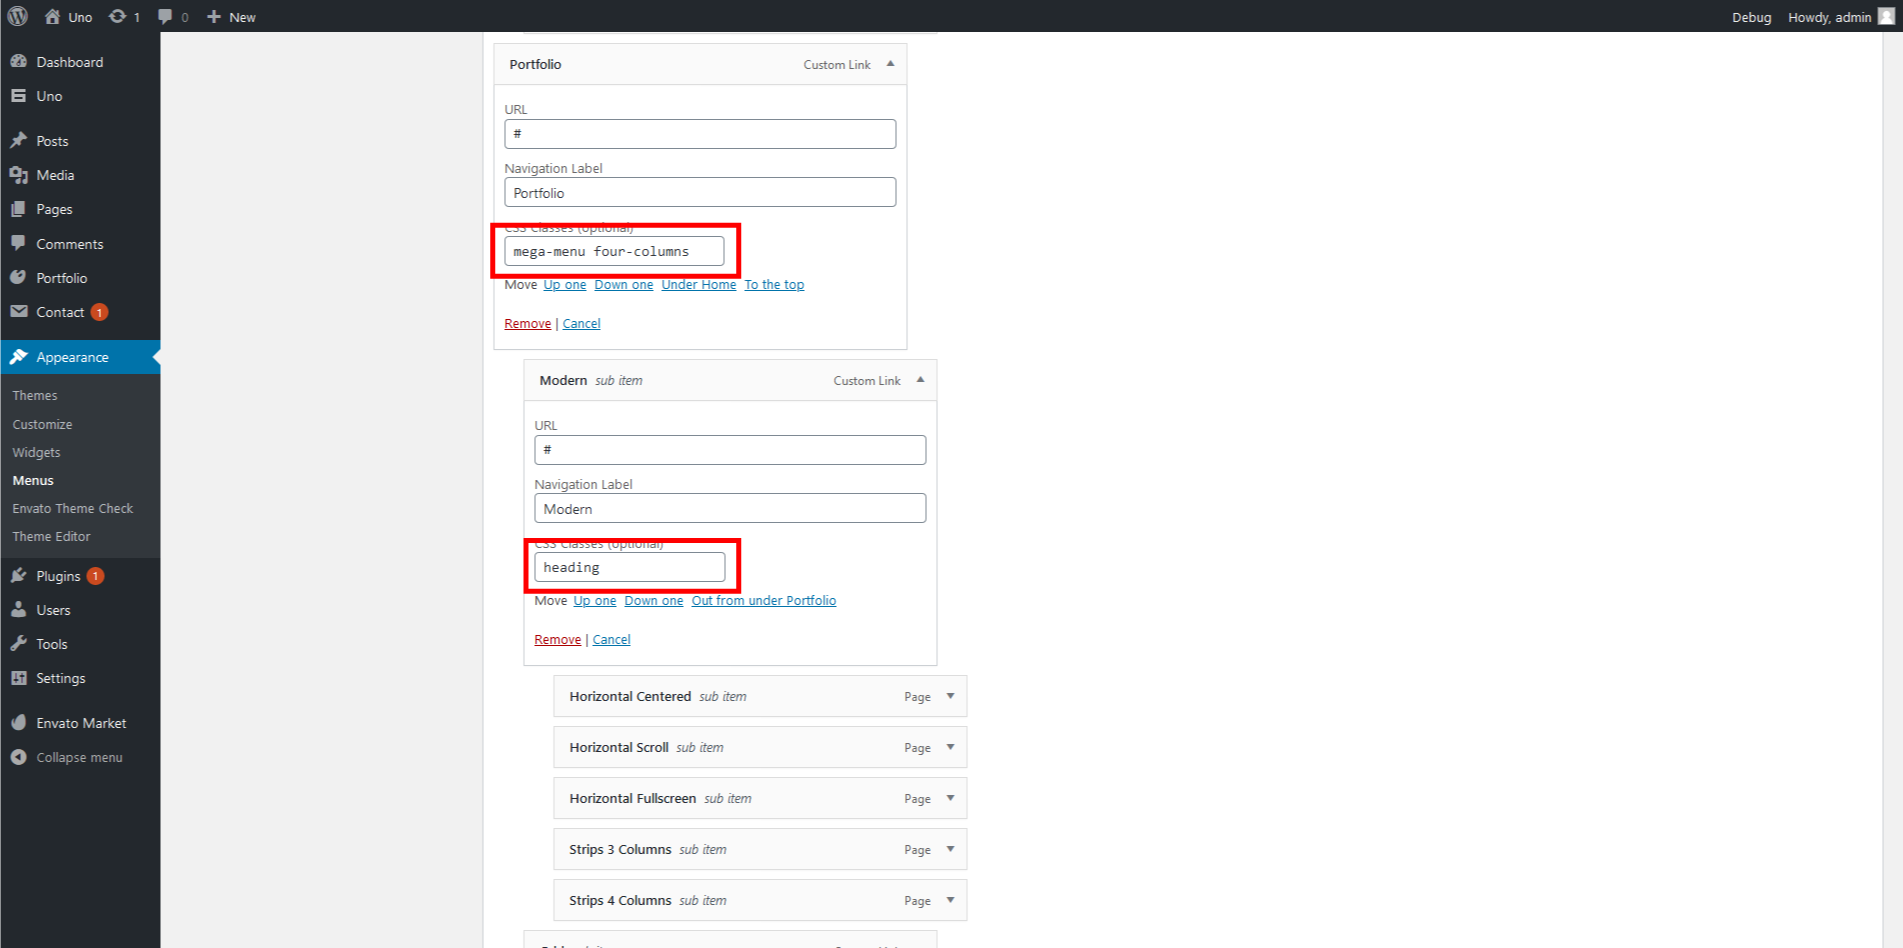
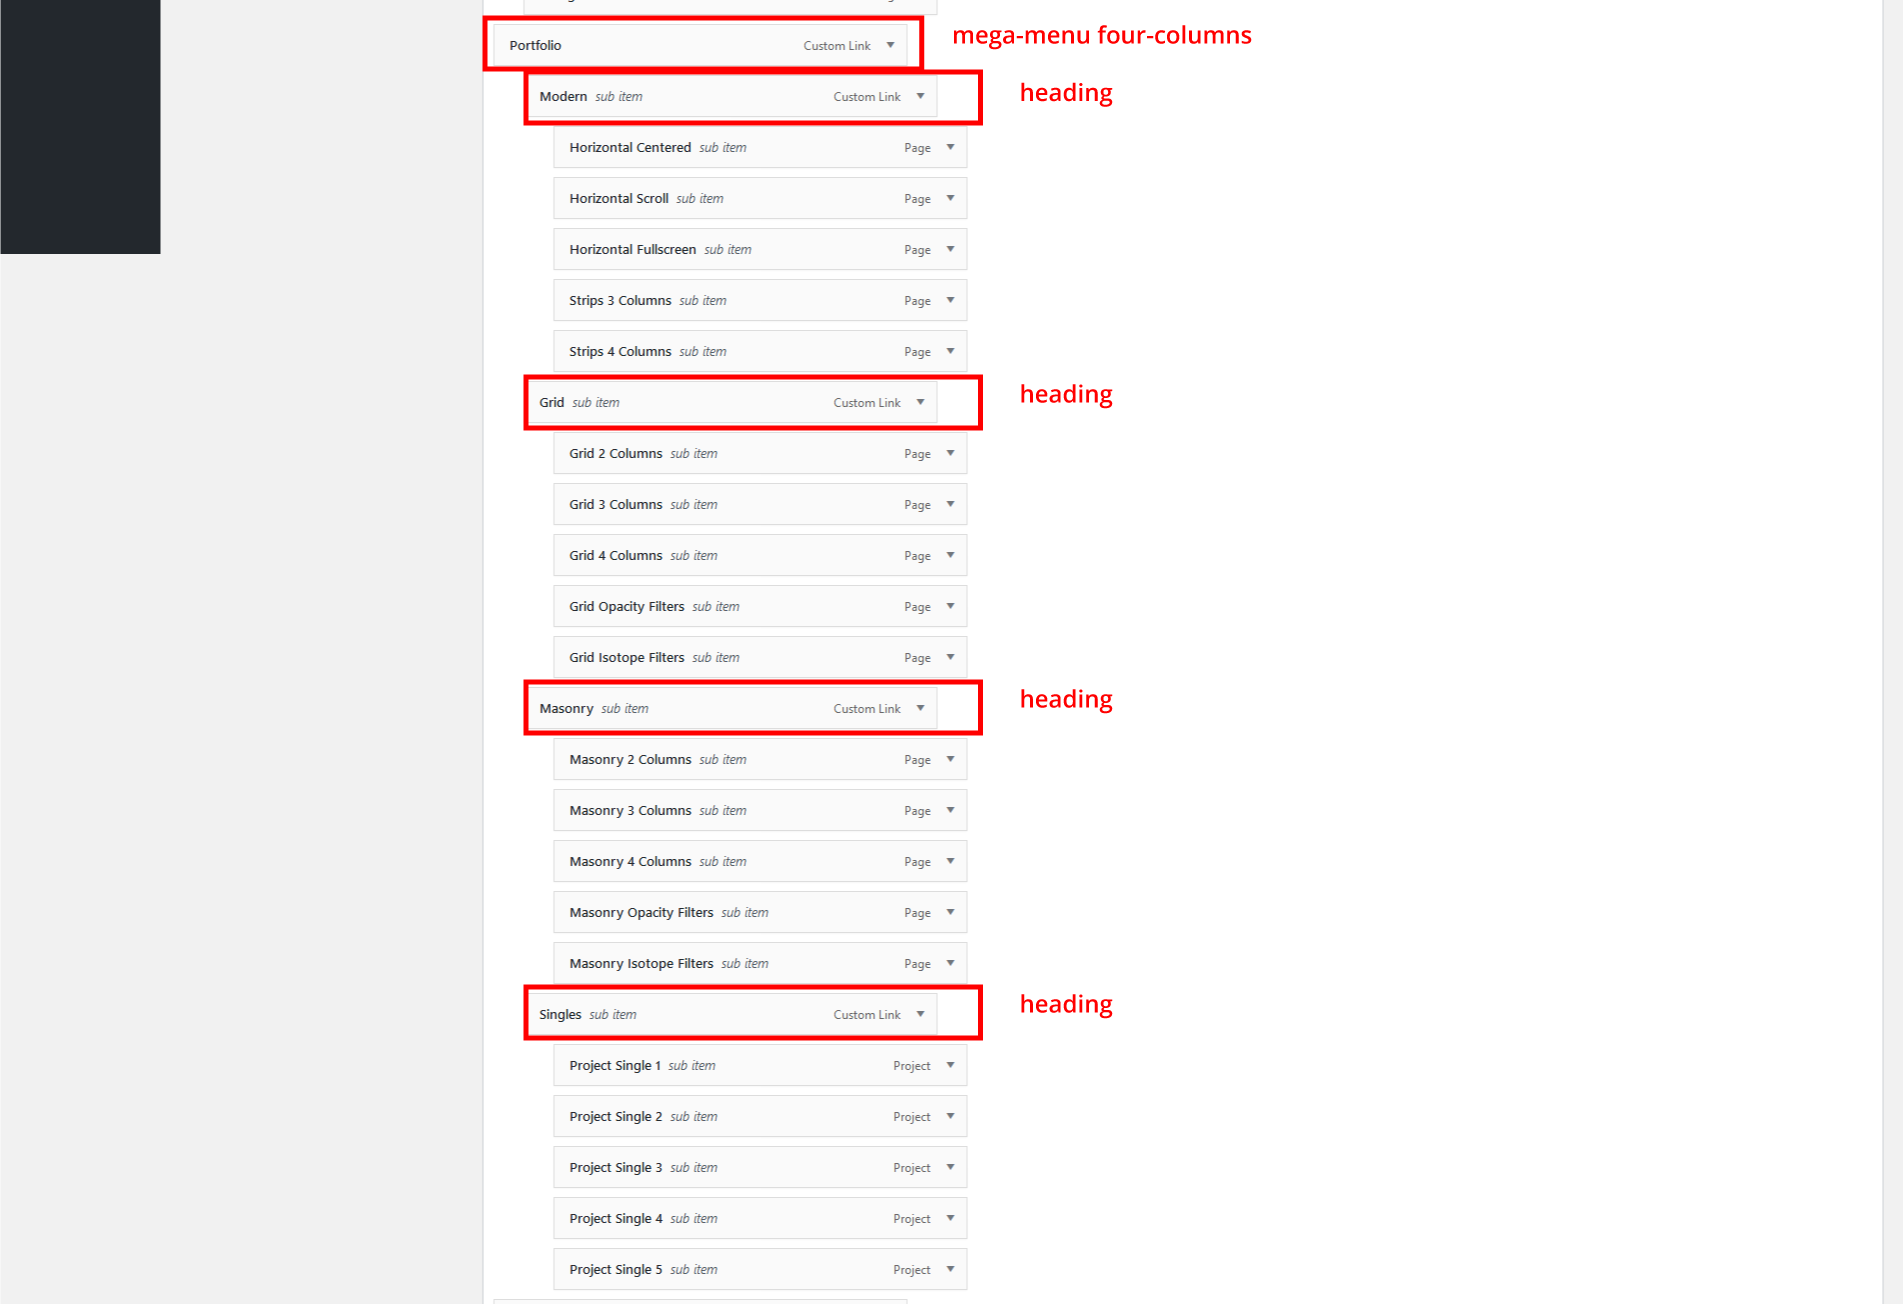
How To Create Mega Menu
Mega menus support 2,3,4 columns. To create a mega menu for your site, do the following:
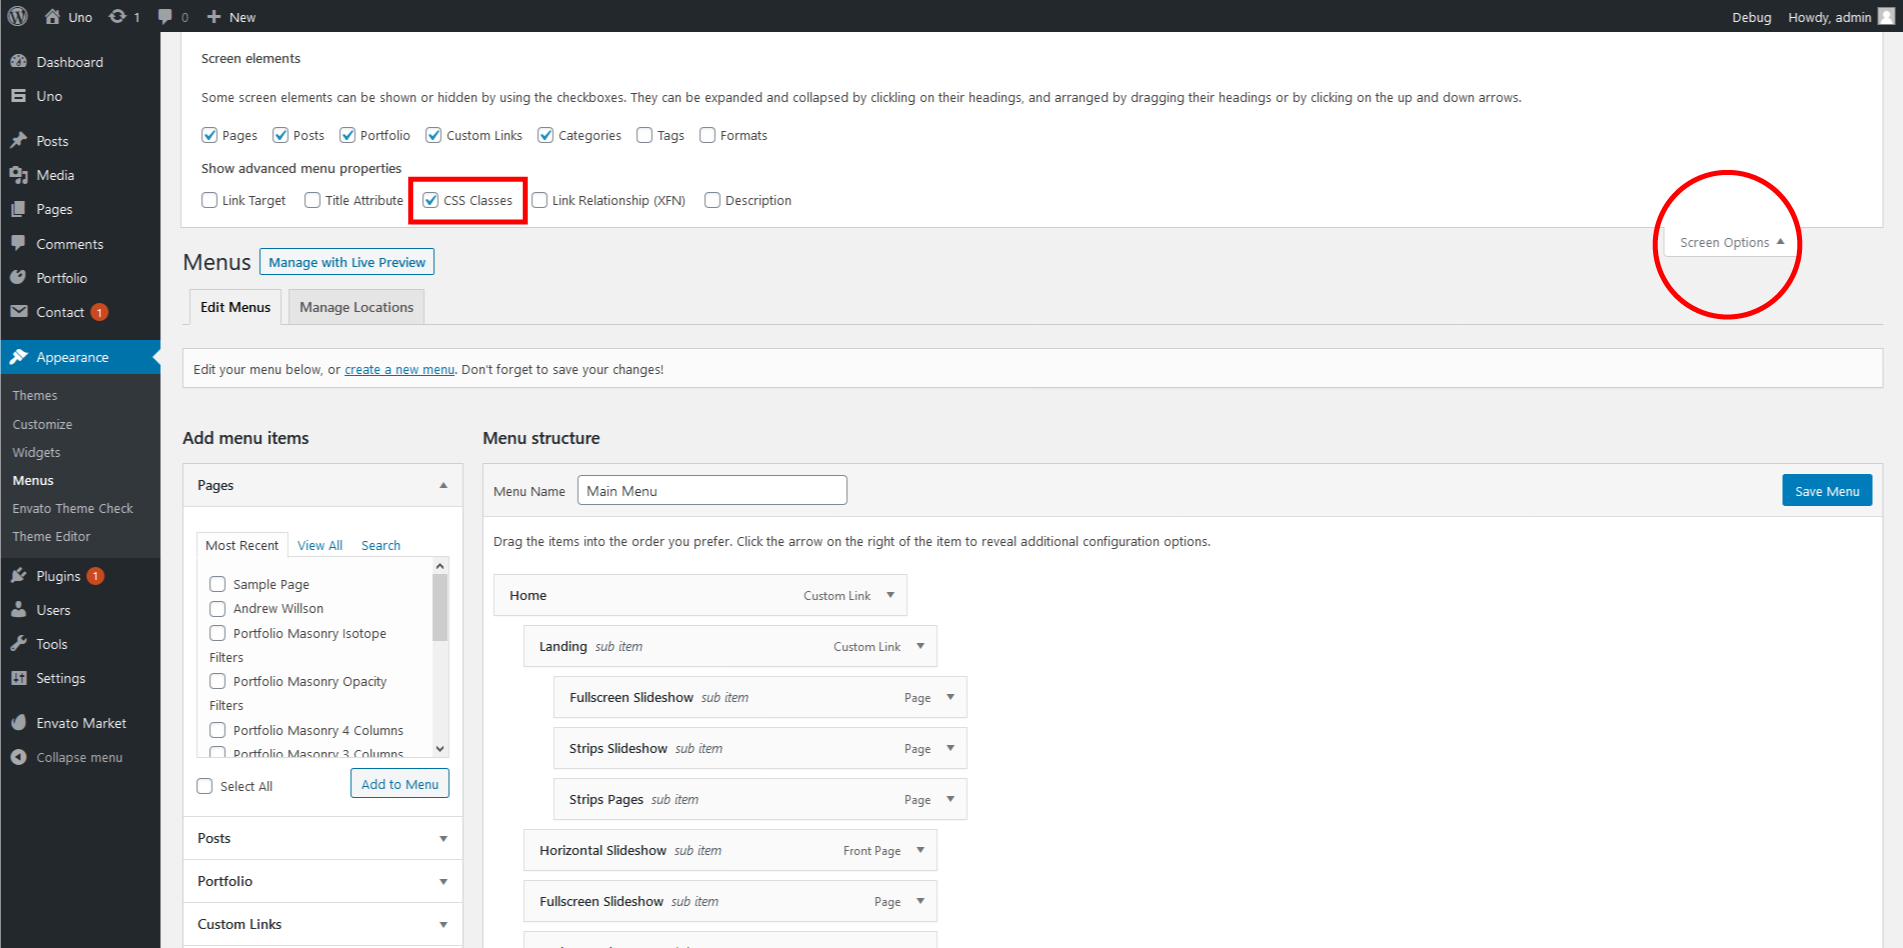
- Navigate to Appearance → Menus
- Click on "Screen Options" in the top right corner.
- Make sure that "CSS Classes" is enabled.
- Create a custom link and add it to the menu, then add "mega-menu four-columns" class to it. Seperate classes with a space, example: "mega-menu two-columns" or "mega-menu three-columns" or "mega-menu four-columns".
- Create 4 custom links and add them to the menu under the link you created in step 4, then add "heading" class to each custom link.
- Create a page and add it to the menu under any of the custom links you just added in step 5.
- Click on 'Save Menu' button.
Updating Theme
Updating Uno can be handled multiple ways. Depending on your workflow choose the option that makes the most sense for you.
- Envato Market Plugin
- Manual Update method (WordPress or FTP)
Using the Envato Market Plugin
The Envato Market Plugin helps you to receive updates to your themes purchased through Envato Market (ThemeForest). The plugin Settings Page allows you to configure your Envato API Personal Token.
This API Token is generated from build.envato.com and will allow WordPress to securely receive item updates. Once the Envato API connection is made from the Settings page, a list of available Themes will be shown. Any available theme updates can be applied here.
- Download the Envato Market Plugin
- Upload the plugin .zip via the Plugins >Add New section of the WordPress admin dashboard
- Click Install Now and then Activate Plugin
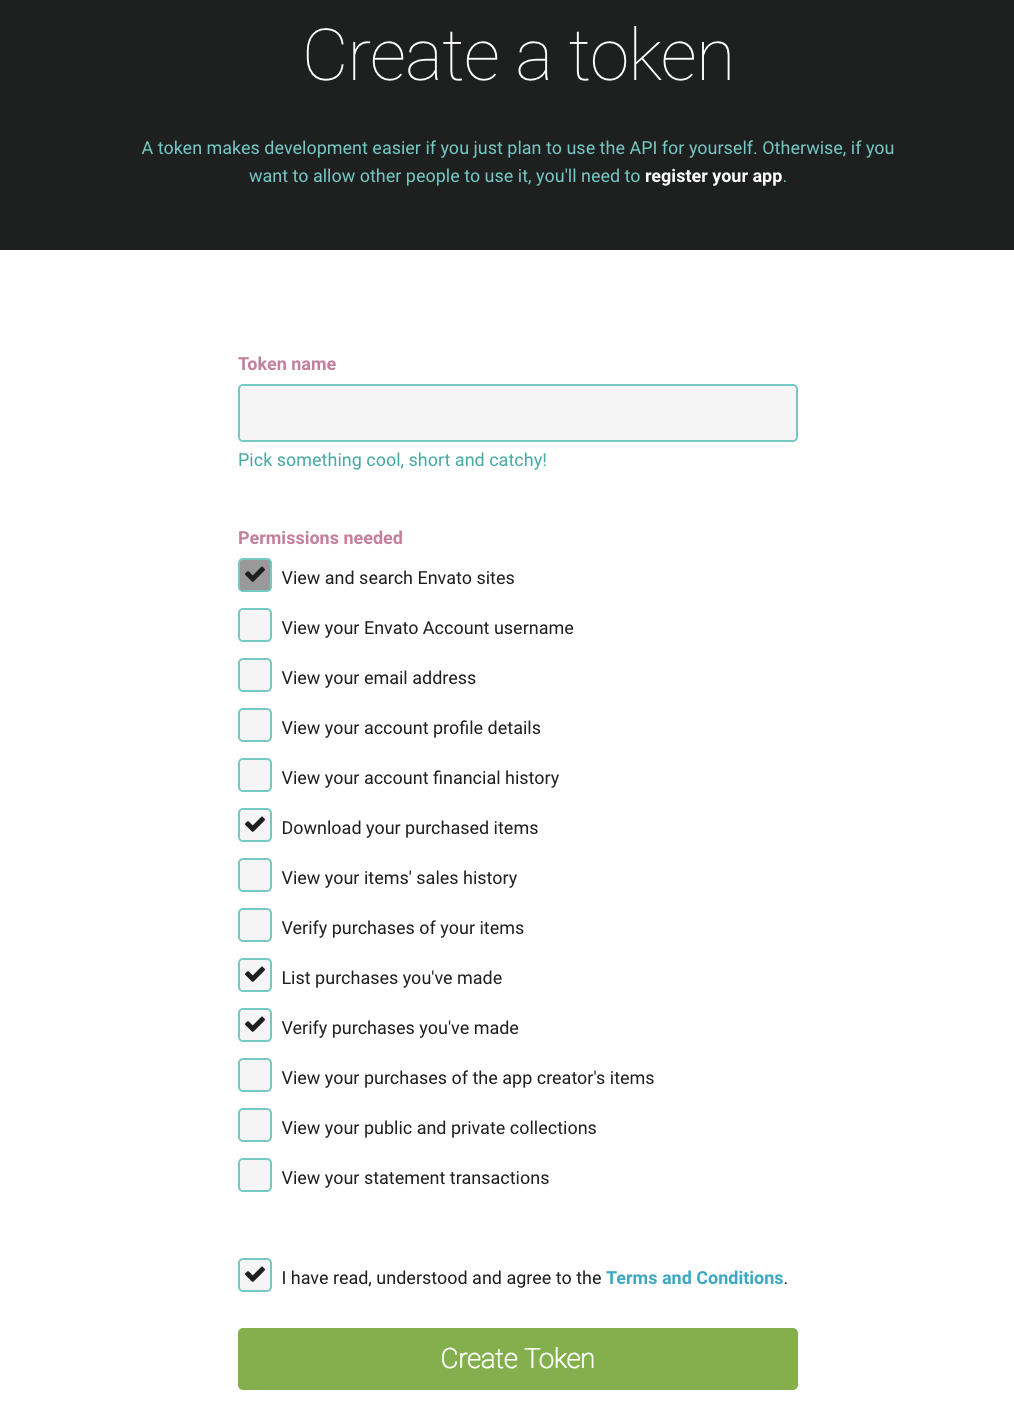
- Now head to the Envato Market plugin page and click on the Generate a personal token link. We’re going to generate a token from Envato that will allow a connection between the plugin and ThemeForest.
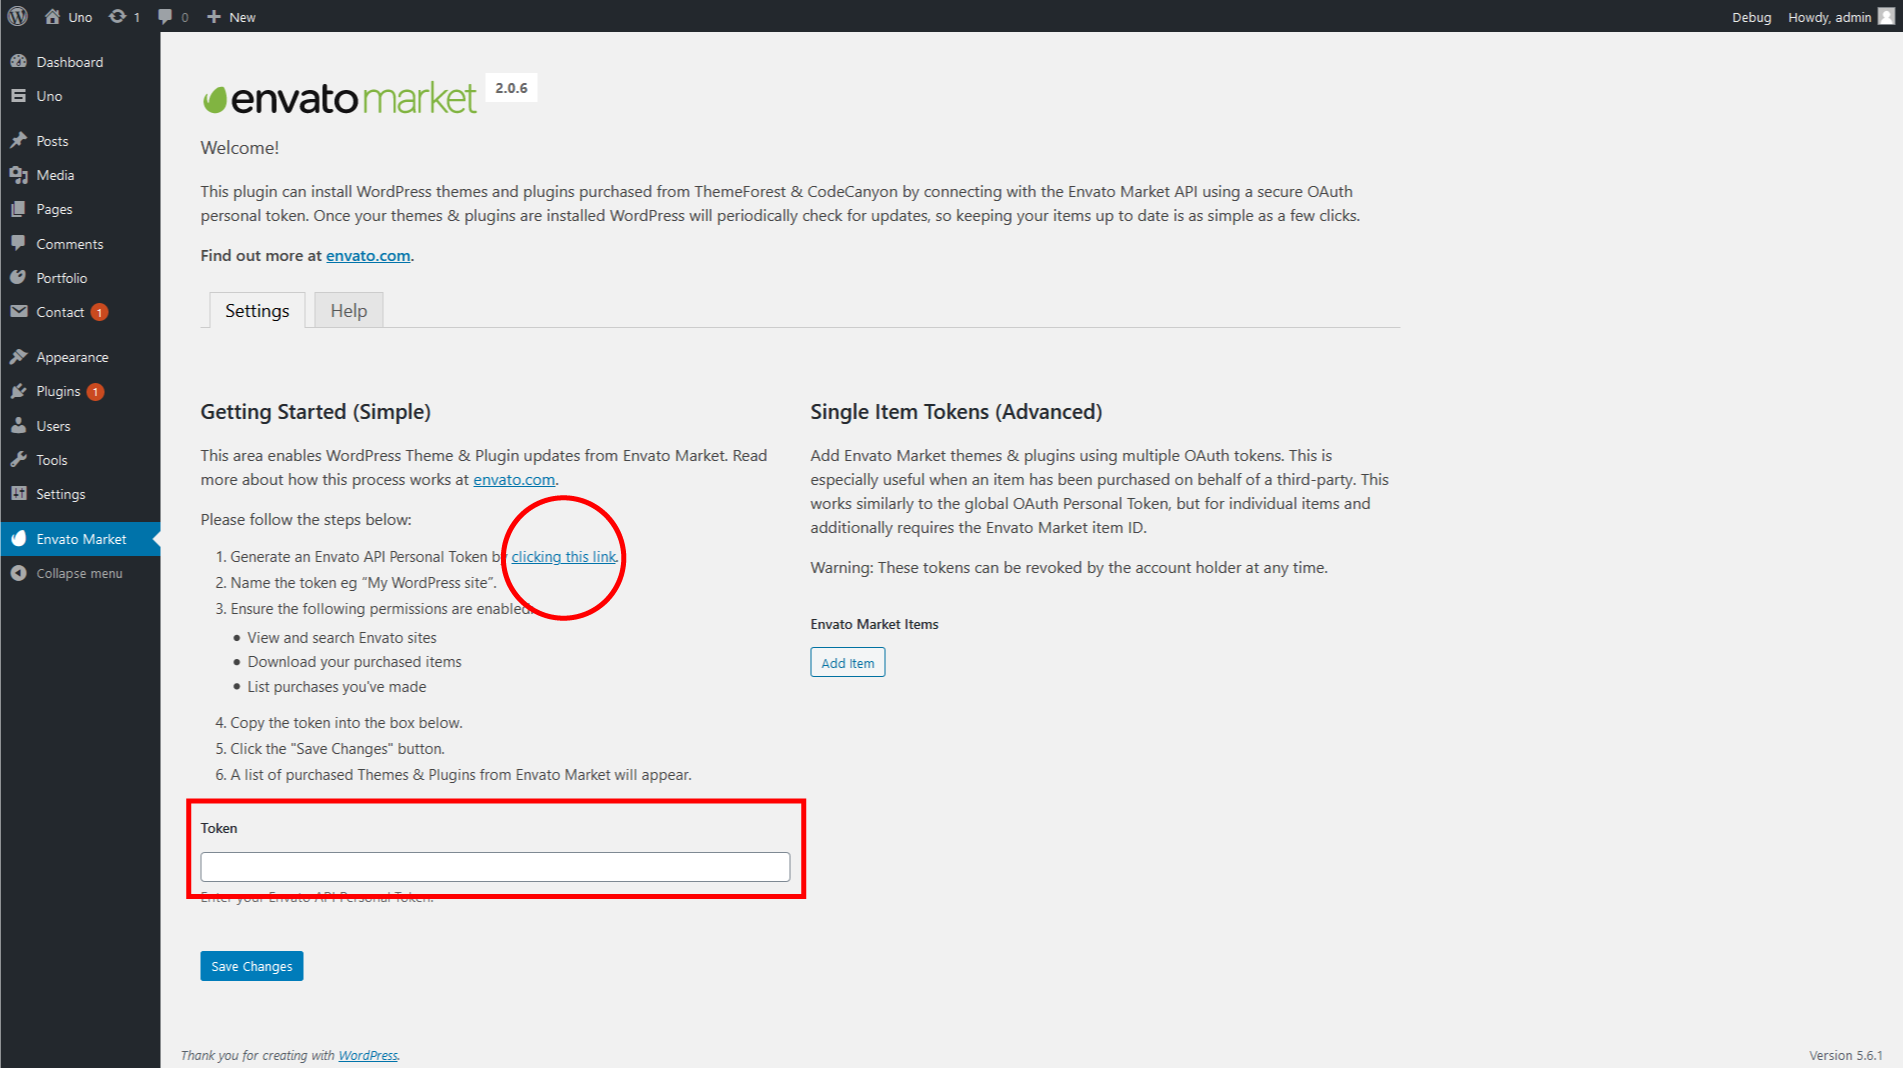
- 5- Next give your token a name and check the box that you have read and agree to the terms. Click the Create Token button to generate your token.
- 6- Copy your token that’s been generated and head back to your WordPress setup in the plugin page to paste it in the token field. This should allow Salient to show up as one of your themes within the plugin – from here on it’s smooth sailing.
Manual Update method
If you don’t want to or can’t use the plugin, you can always update the theme manually in two ways:
Via WordPress
- Download the latest version of the Uno Theme from your ThemeForest account.
- Remove the theme from Appearance → Themes by selecting and installing another theme.
- Re-upload the theme from Appearance → Themes → Add New.
- When the theme is updated, update the required plugins if you see the ‘Require Update’ notice next some plugins name.
- After the update make sure to Save your Theme Options.
- Don’t forget to update the required plugins. You will see a notification message in Uno → Install Plugins telling you the required and recommended plugins must be updated.
Via FTP
- Remove the folder "Uno" located in wp-content/themes. Next upload the updated theme in the same place.
- When the theme is updated, update the required plugins if you see the ‘Require Update’ notice next some plugins name.
- After the update make sure to Save your Theme Options.
- Don’t forget to update the required plugins. You will see a notification message in Uno → Install Plugins telling you the required and recommended plugins must be updated.
Plugins
Uno includes 4 plugins, 2 of them that must be installed and activated: CodeSymbol Core and CodeSymbol Page Builder. The CodeSymbol Core plugin is required for the theme to work, as it contains all of the theme's basic functionality (Theme Options, Page's options, Post's options, Portfolio). Any other plugin that comes with the theme is optional. Here's a list of all the plugins that come with the theme:
- CodeSymbol Core
- CodeSymbol Page Builder
- CodeSymbol Demo Importer
- Contact Form 7
CodeSymbol Core Plugin
The CodeSymbol Core plugin is required for the theme to work so it must be installed and activated. as it contains all of the theme’s basic functionality (Theme Options, Page's options, Post's options, Portfolio).
CodeSymbol Page Builder Plugin
The CodeSymbol Page Builder plugin unleashes the true power of Uno as many elements are unique and handcrafted exclusively by CodeSymbol.
CodeSymbol Demo Importer Plugin
The CodeSymbol Demo Importer is contained within the Uno dashboard panel. To access it, first ensure that you’ve installed and activated the CodeSymbol Demo Importer plugin.
It enables you to have a demo just like Our Main Demo. But in order to do that, first you have to make sure you've met the servers requirements and the plugins requirements as shown here.
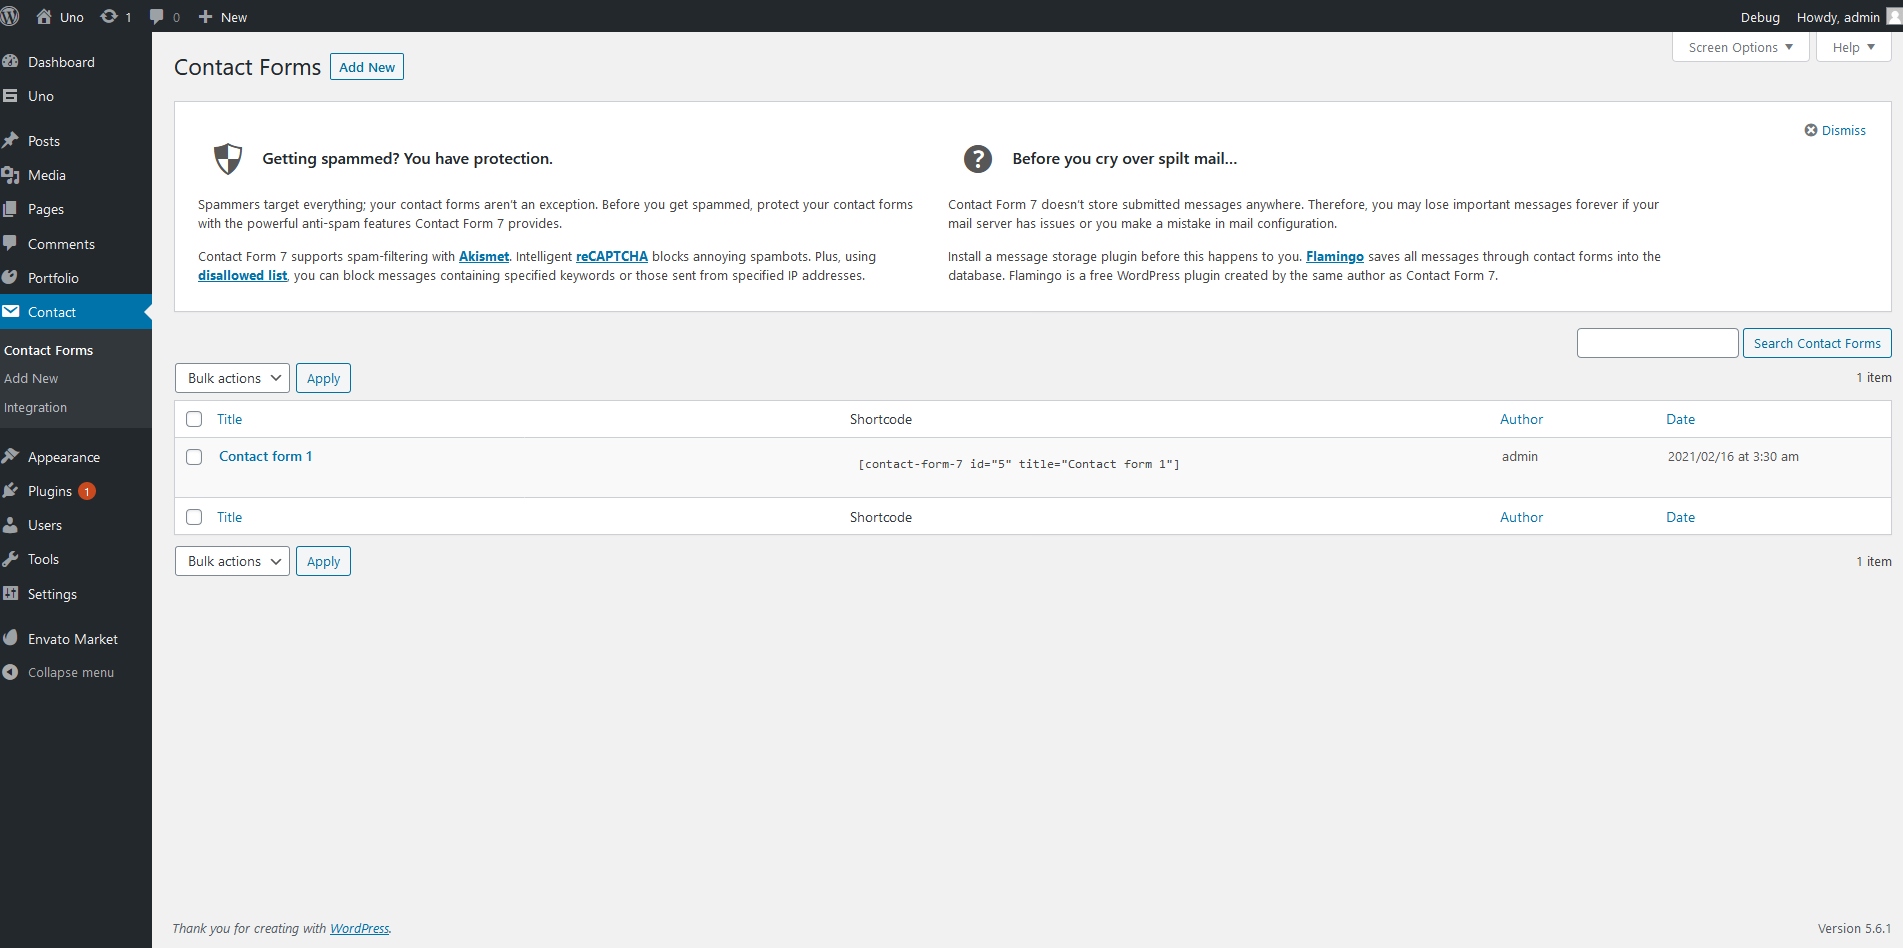
Contact Form 7 Plugin
Contact Form 7 plugin can manage multiple contact forms, plus you can customize the form and the mail contents flexibly with simple markup. The form supports Ajax-powered submitting, CAPTCHA, Akismet spam filtering and so on.
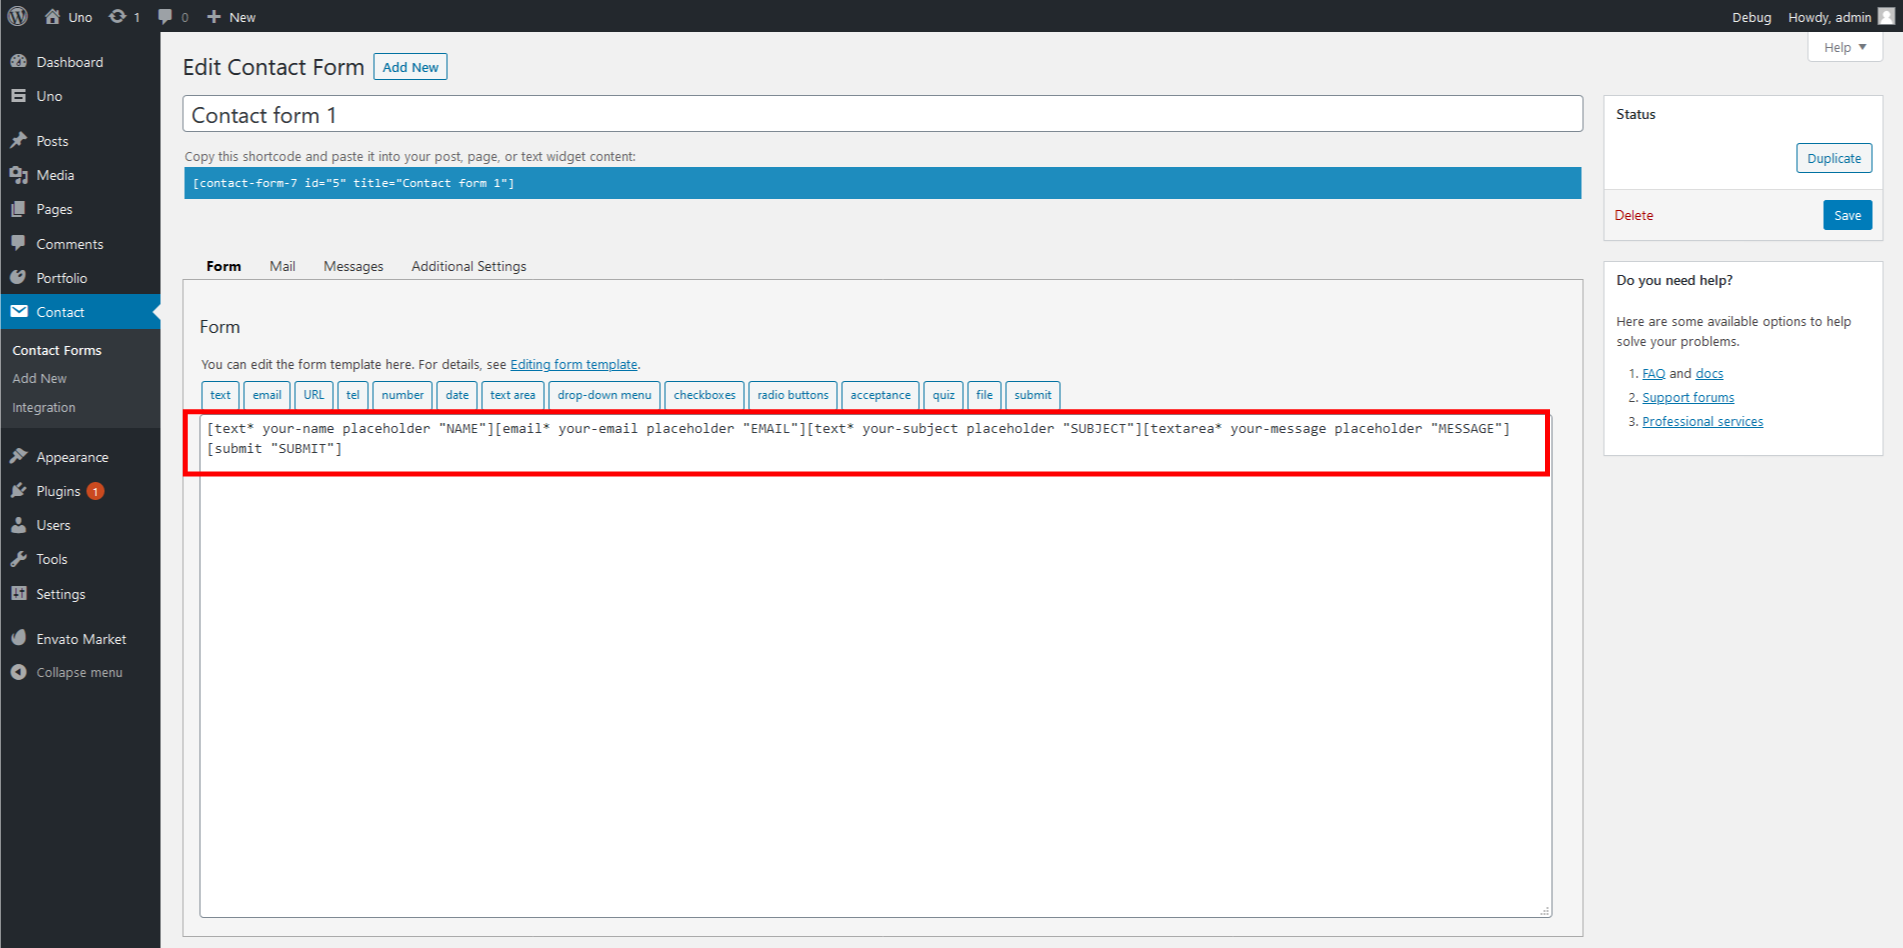
When you activate the Contact Form 7 plugin (and you import Demo Contents) in the WordPress → Contact menu, you can find the form available in our demo. To implement a contact form, you need to install the CF7 Plugin from Dos → Install Plugins. Once you have installed the plugin, create a form using the CF7 plugins’ options, and insert it in your page as a shortcode.
The form format must be written in a way to be styled correctly like in our demo, here's the correct format:
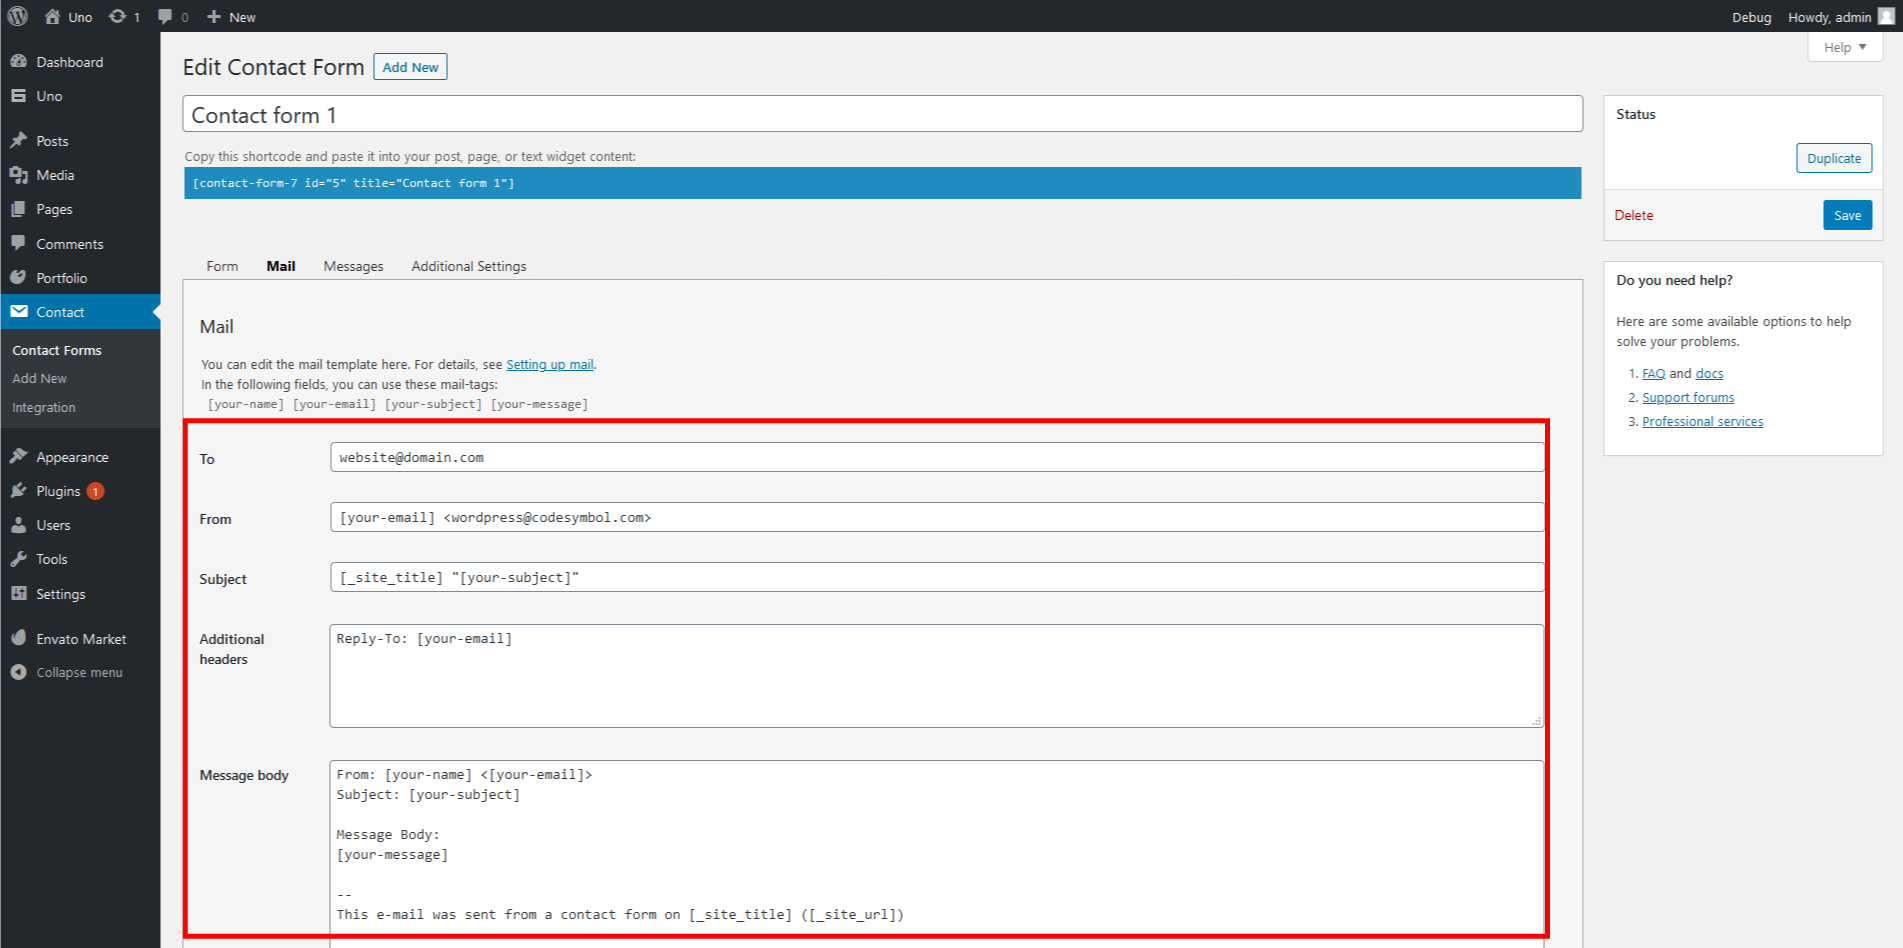
Next you have to edit the form settings in order to add the recpient email, message subject and message structure. Head to Mail tab and fill the fields.
Theme Options
Theme options are at the core of Uno and provide you with power to drastically change the appearance of your site without ever touching a line of code. To Access the options panel head to the Uno menu link in your WordPress admin dashboard.
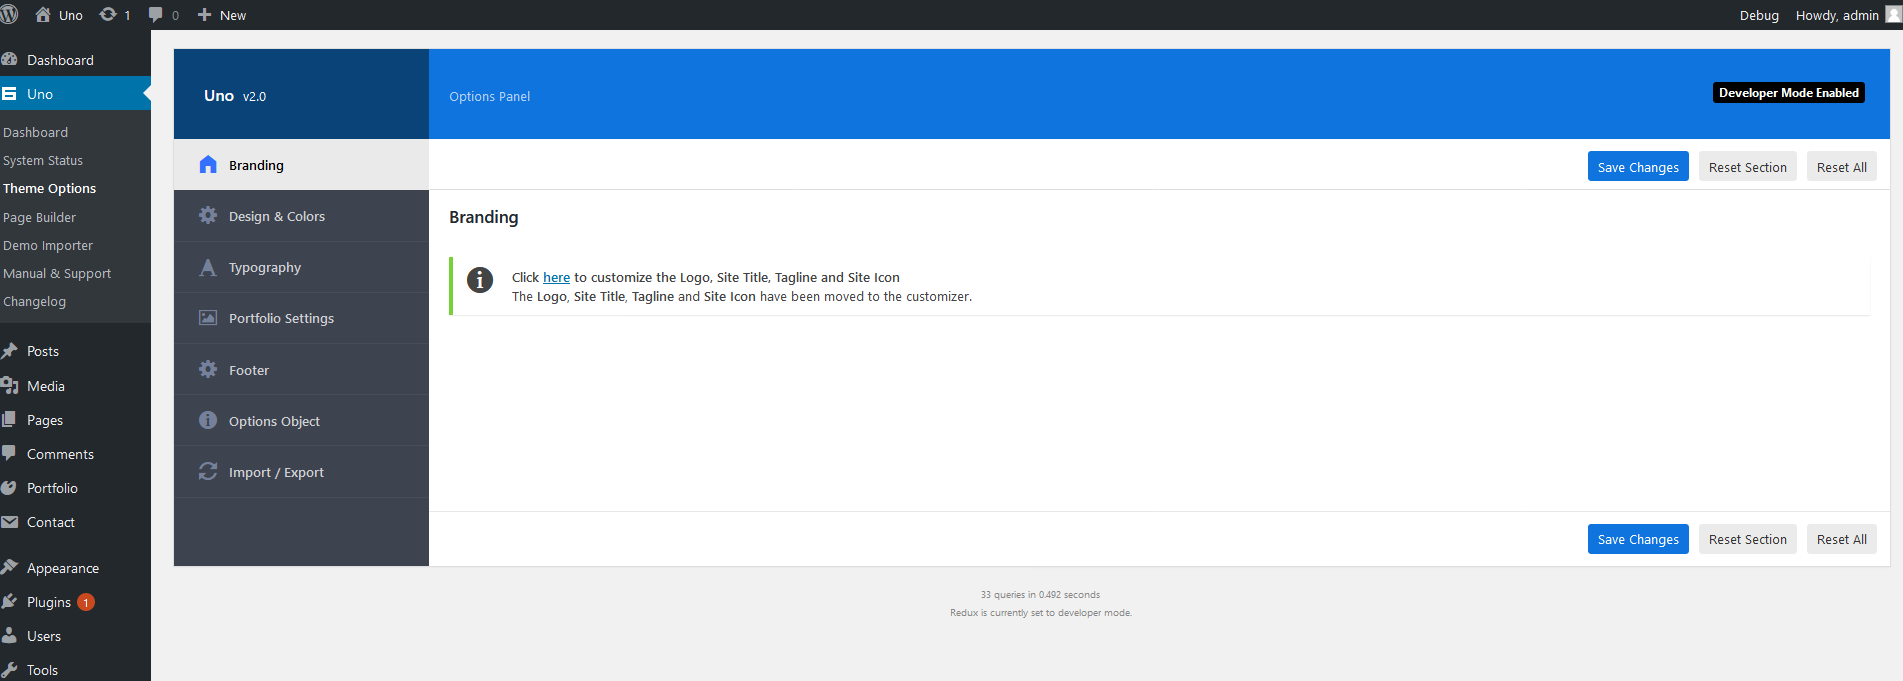
All of these options are global options, meaning they will effect the entire website. Each section in this chapter will give an overview of what the options do for each grouping. There are also page/post specific options located on every edit page/post screen. Uno's advanced Theme Options panel features a number of useful options. They are logically organized into tabbed sections, let's explore these sections:
Branding
In this section you can find links to define general aspects of your site: the logo, the site title, the tag line and the site icon.
Design & Colors
In this section you can switch the website's skin between Dark & Light.
Typography
In this section you can change the font properties of your website.
- Use Default Theme Font?: Whether you want to use the default font included within the theme (Open Sans) or if you want to use any of the Google fonts.
- Body Font: You can choose which font you want to use and adjust its properties (Font size, line height, font style)
Portfolio
In this section you can change the properties of projects.
- Show Projects Navigation?: You can show/hide projects navigation in project footer.
- Default Portfolio Page: Select which page will be the default page for portfolio. Shown in project footer.
- Show Recent Projects?: You can show/hide recent projects in project footer.
- Recent Projects Columns Count: Select columns count for recent projects shown in project footer.
Footer
In this section you can change the properties of your website's footer.
- Copyrights: You can show/hide copyrights section in the footer. Also you can edit the copyrights text however you want.
- Social Icons: You can show/hide social icons section in the footer. Also you can edit/reorder the icons however you want.
Page Builder
The CodeSymbol Page Builder unleashes the true power of Uno as many elements are unique and handcrafted exclusively by CodeSymbol.
It enables you to build websites without the need for any code knowledge. Building pages now becomes easier, faster, and without any hassle.
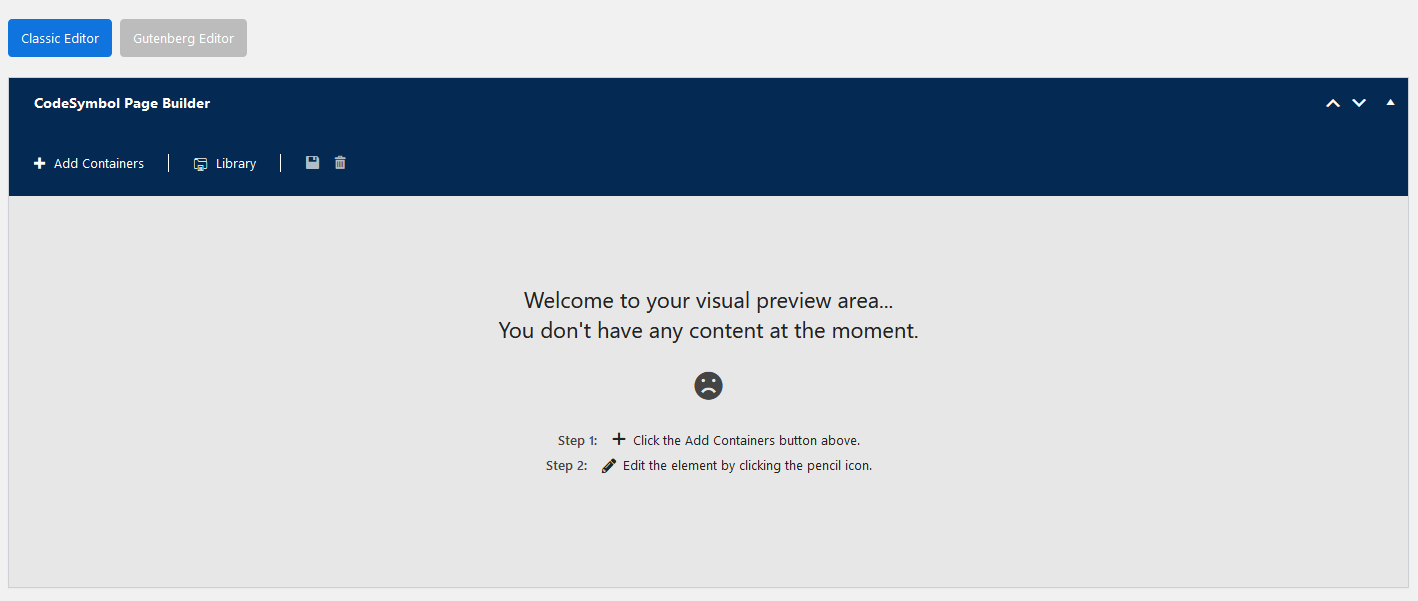
Setup
Setting the page builder should be easy, just make sure you have "CodeSymbol Page Builder" plugin installed and active.
Navigate to Uno -> Page Builder, then make sure to enable the builder for the post types you want to use it in. You can also disable Gutenberg editor if you want to set the builder as the default editor.
Basics
Down below are the basic steps in order to use the page builder:
Switches
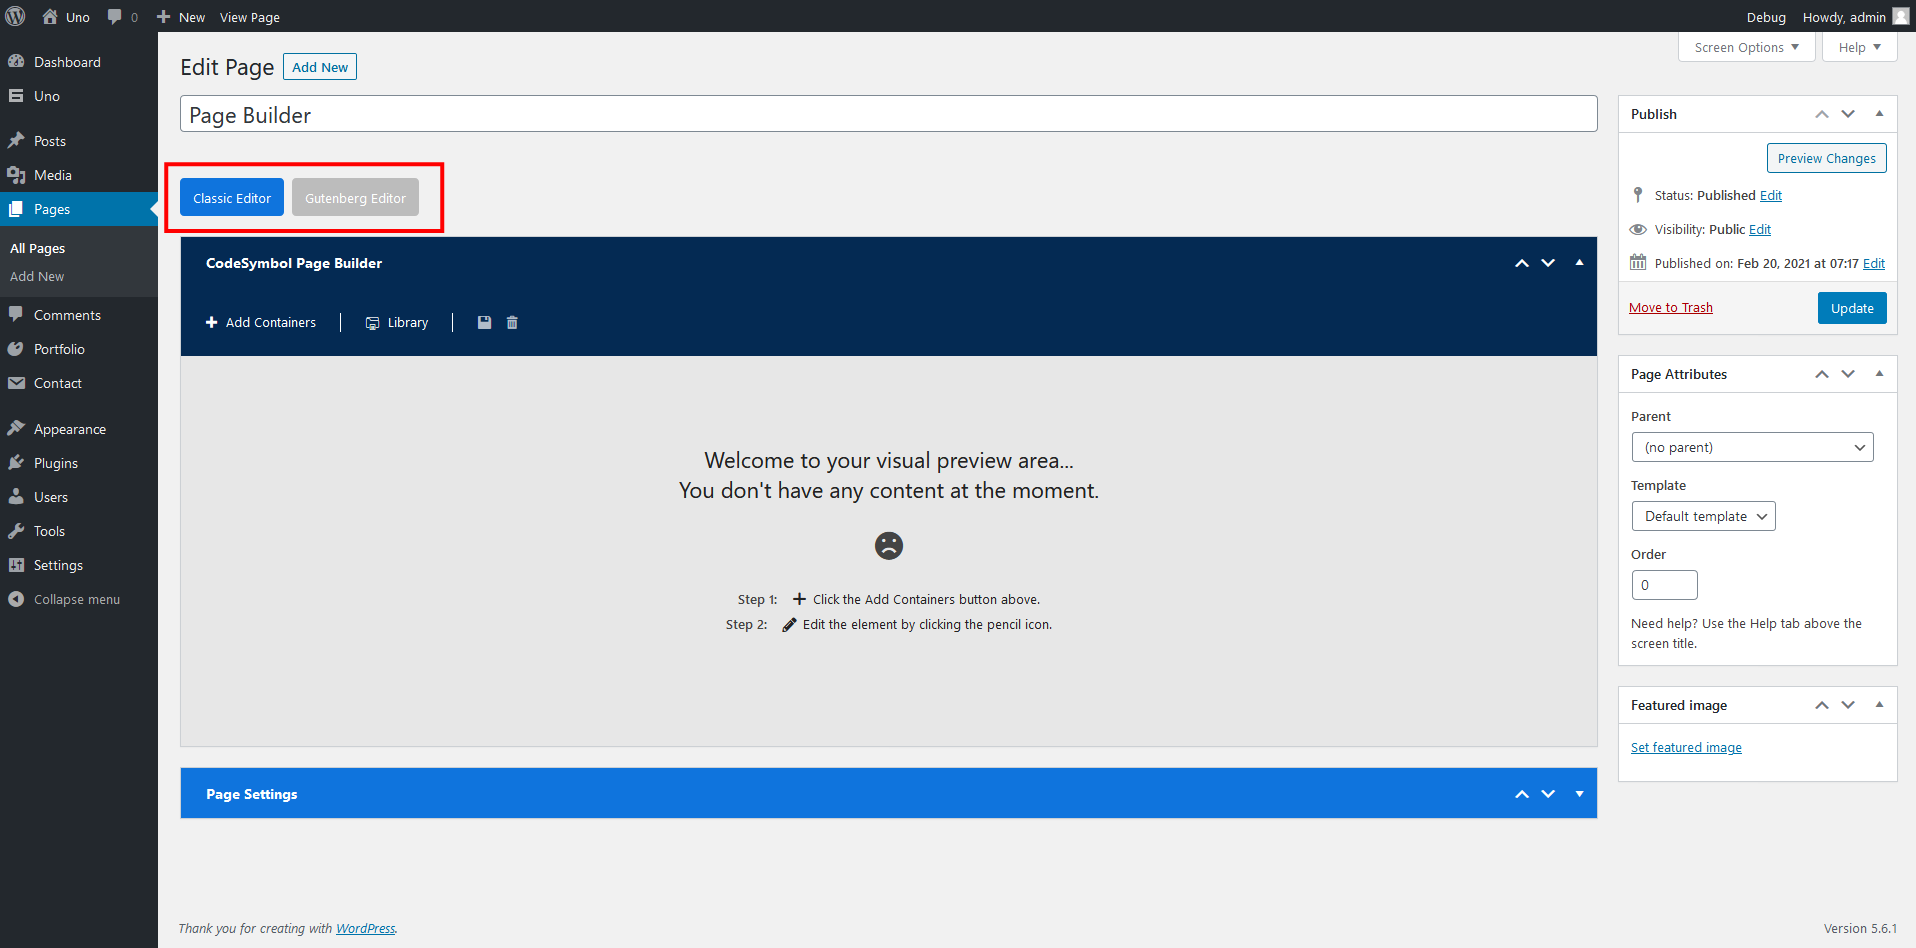
If you have Gutenberg editor enabled and want to use the page builder you will find a "CodeSymbol Page Builder" button that will switch the editor from Gutinberg to page builder.
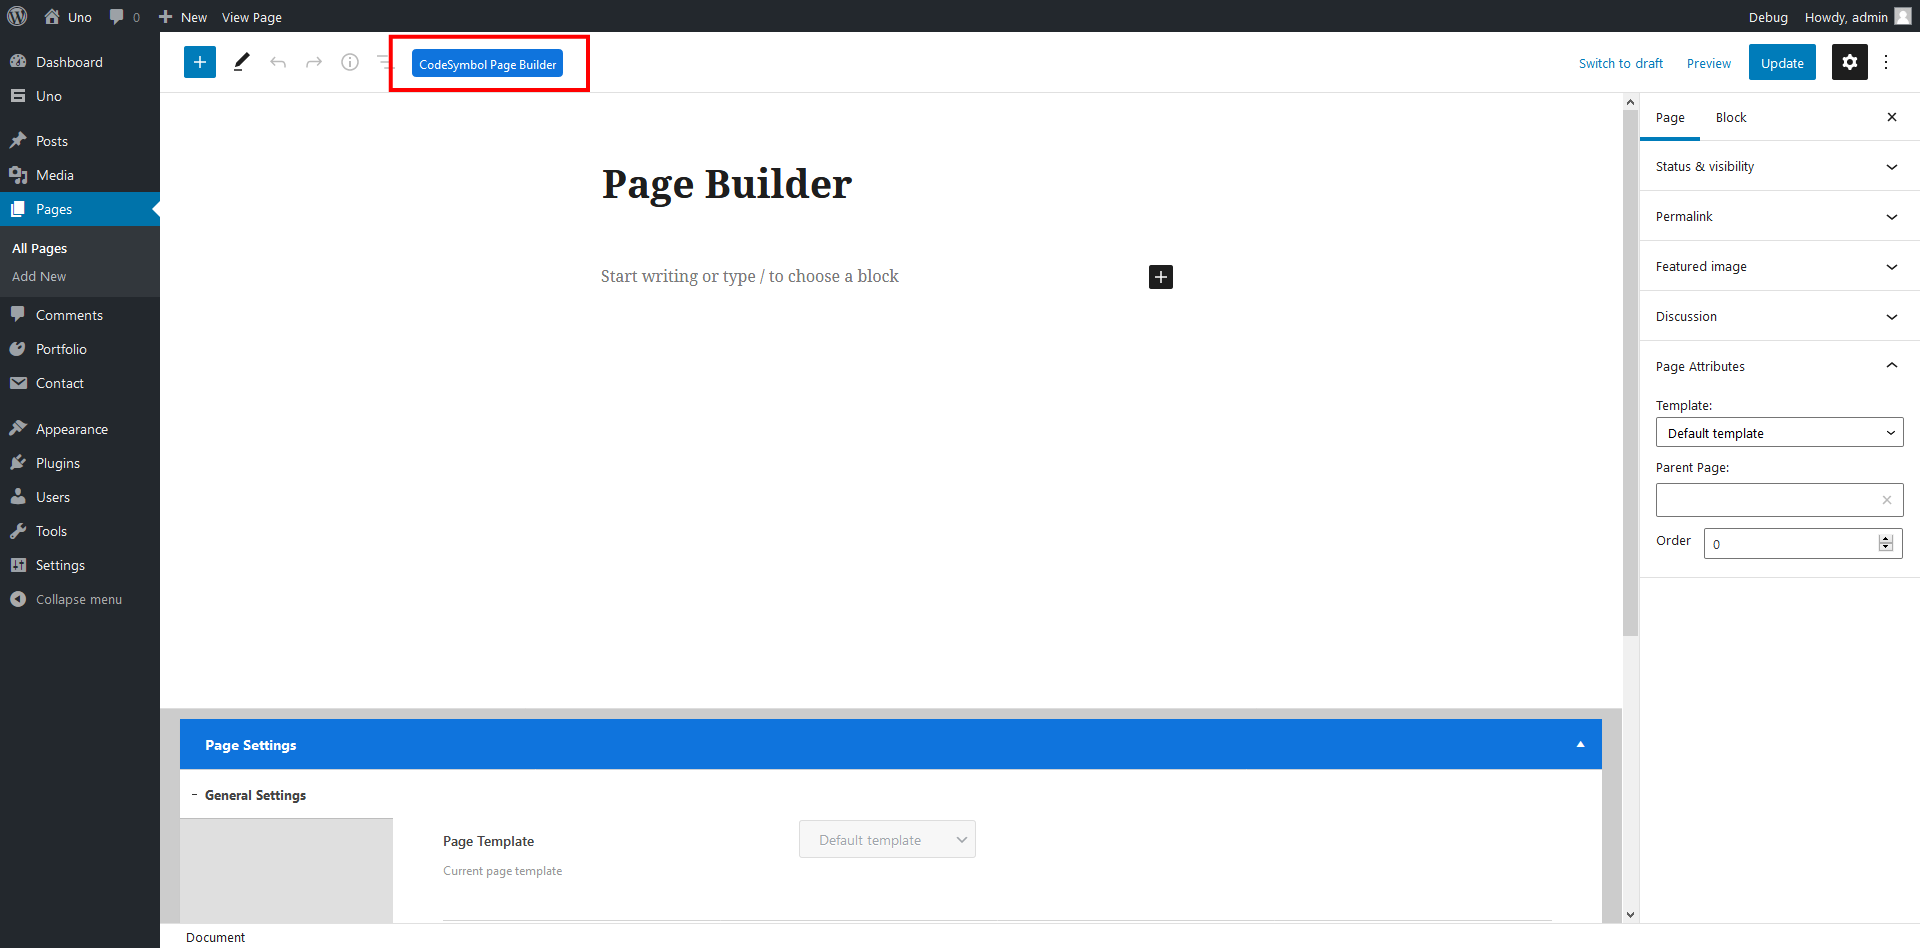
If you don't have Gutenberg editor as enabled and want to use the page builder you will find a "CodeSymbol Page Builder" button that will switch the editor from default to page builder.
Items
There are more than 20 unique items available in the builder that enable you to build any design you want.
Here is a list of some of the items available for the page builder:
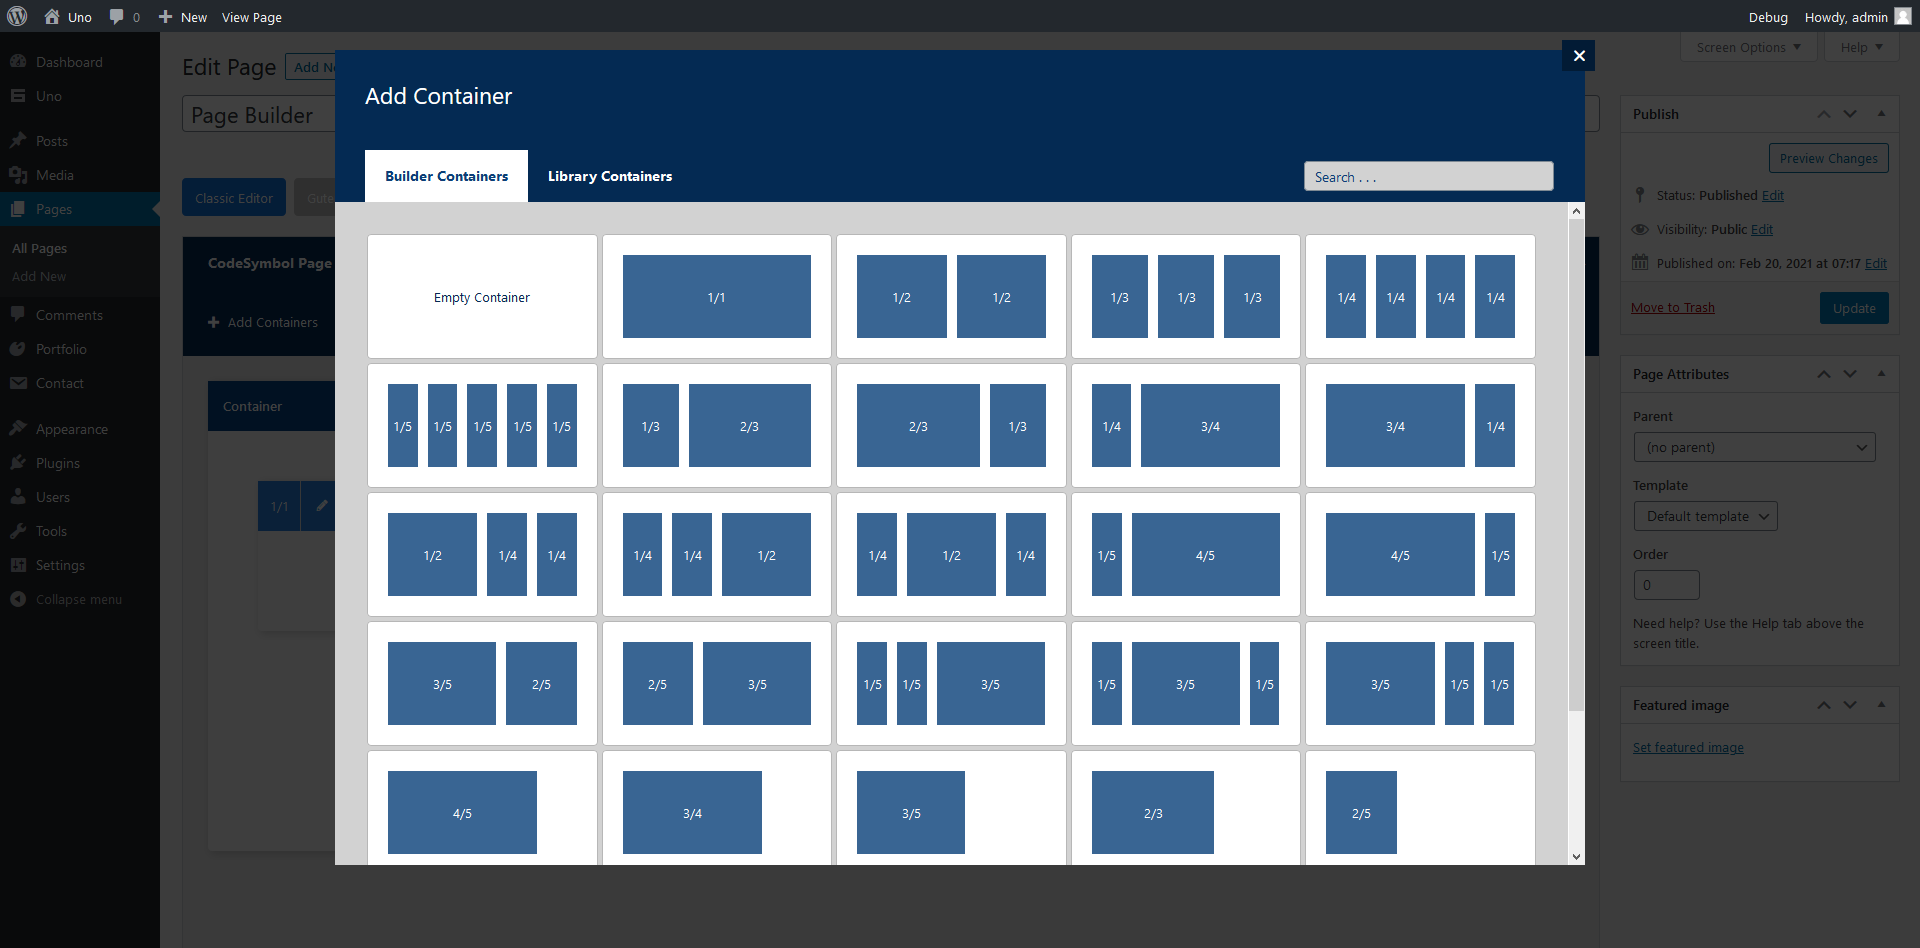
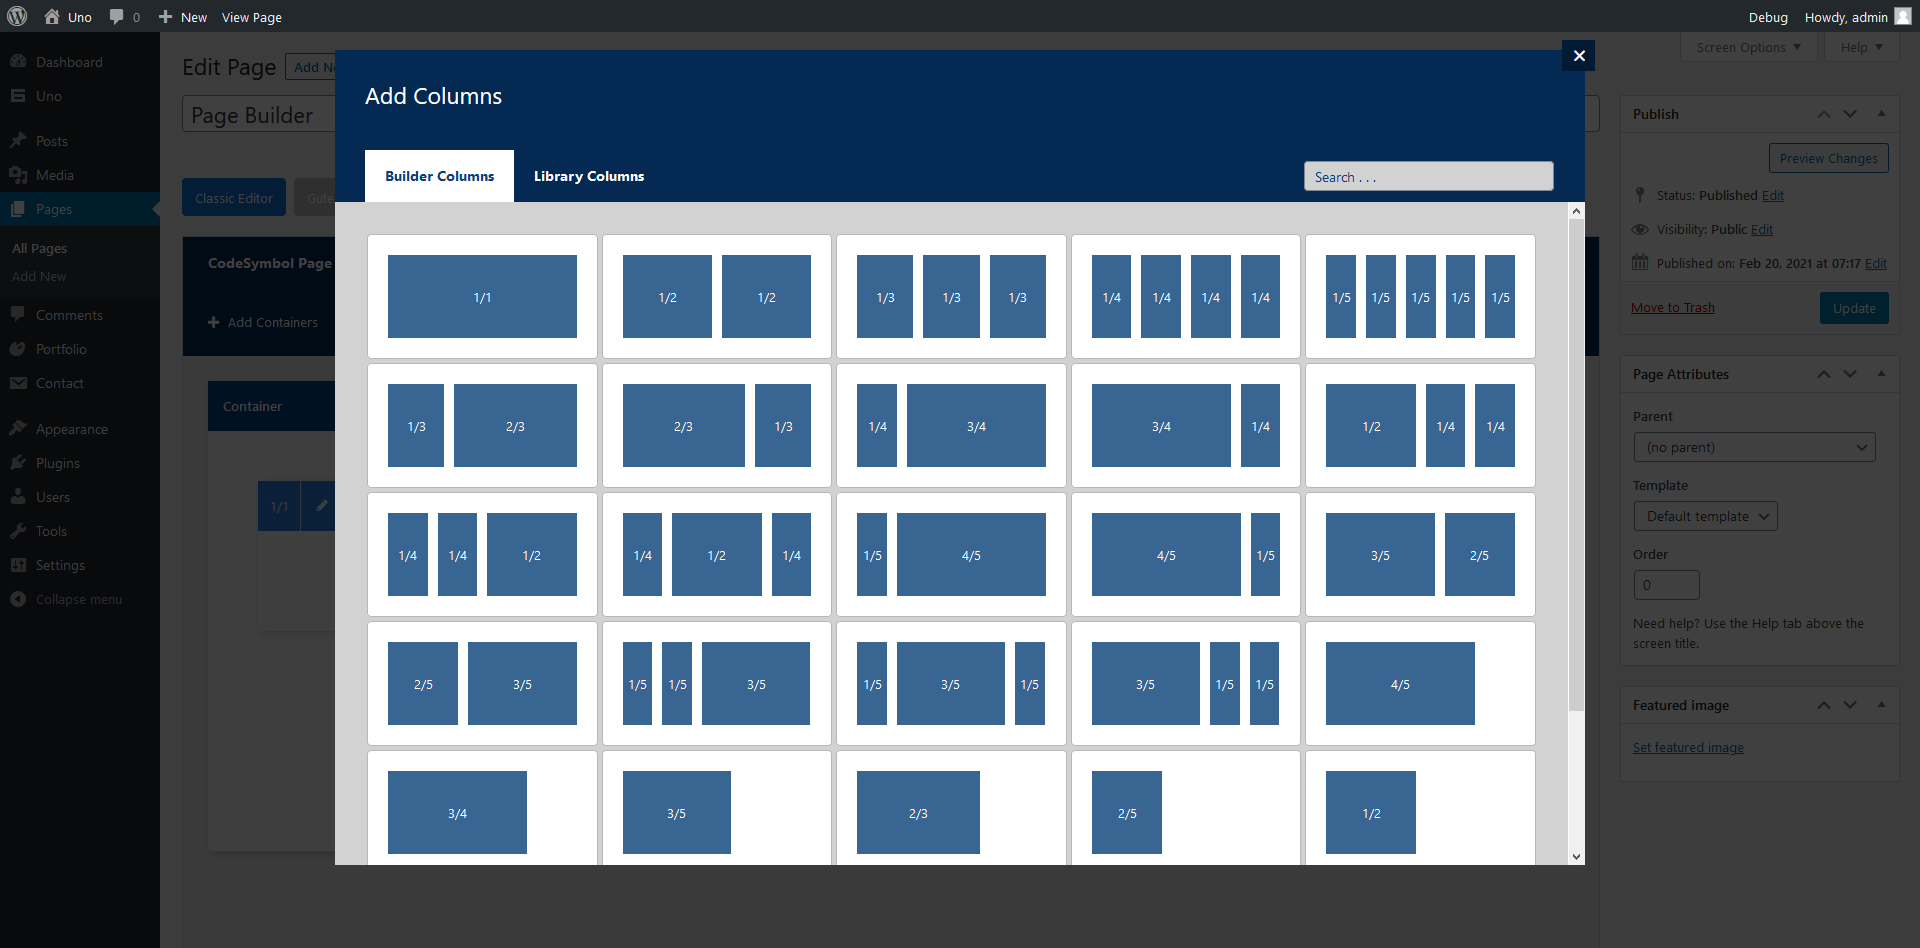
- Container
- Column
- One Whole - (1/1)
- One Half - (1/2)
- One Third - (1/3)
- One Fourth - (1/4)
- One Fifth - (1/5)
- Two Third - (2/3)
- Two Fifth - (2/5)
- Three Fourth - (3/4)
- Three Fifth - (3/5)
- Four Fifth - (4/5)
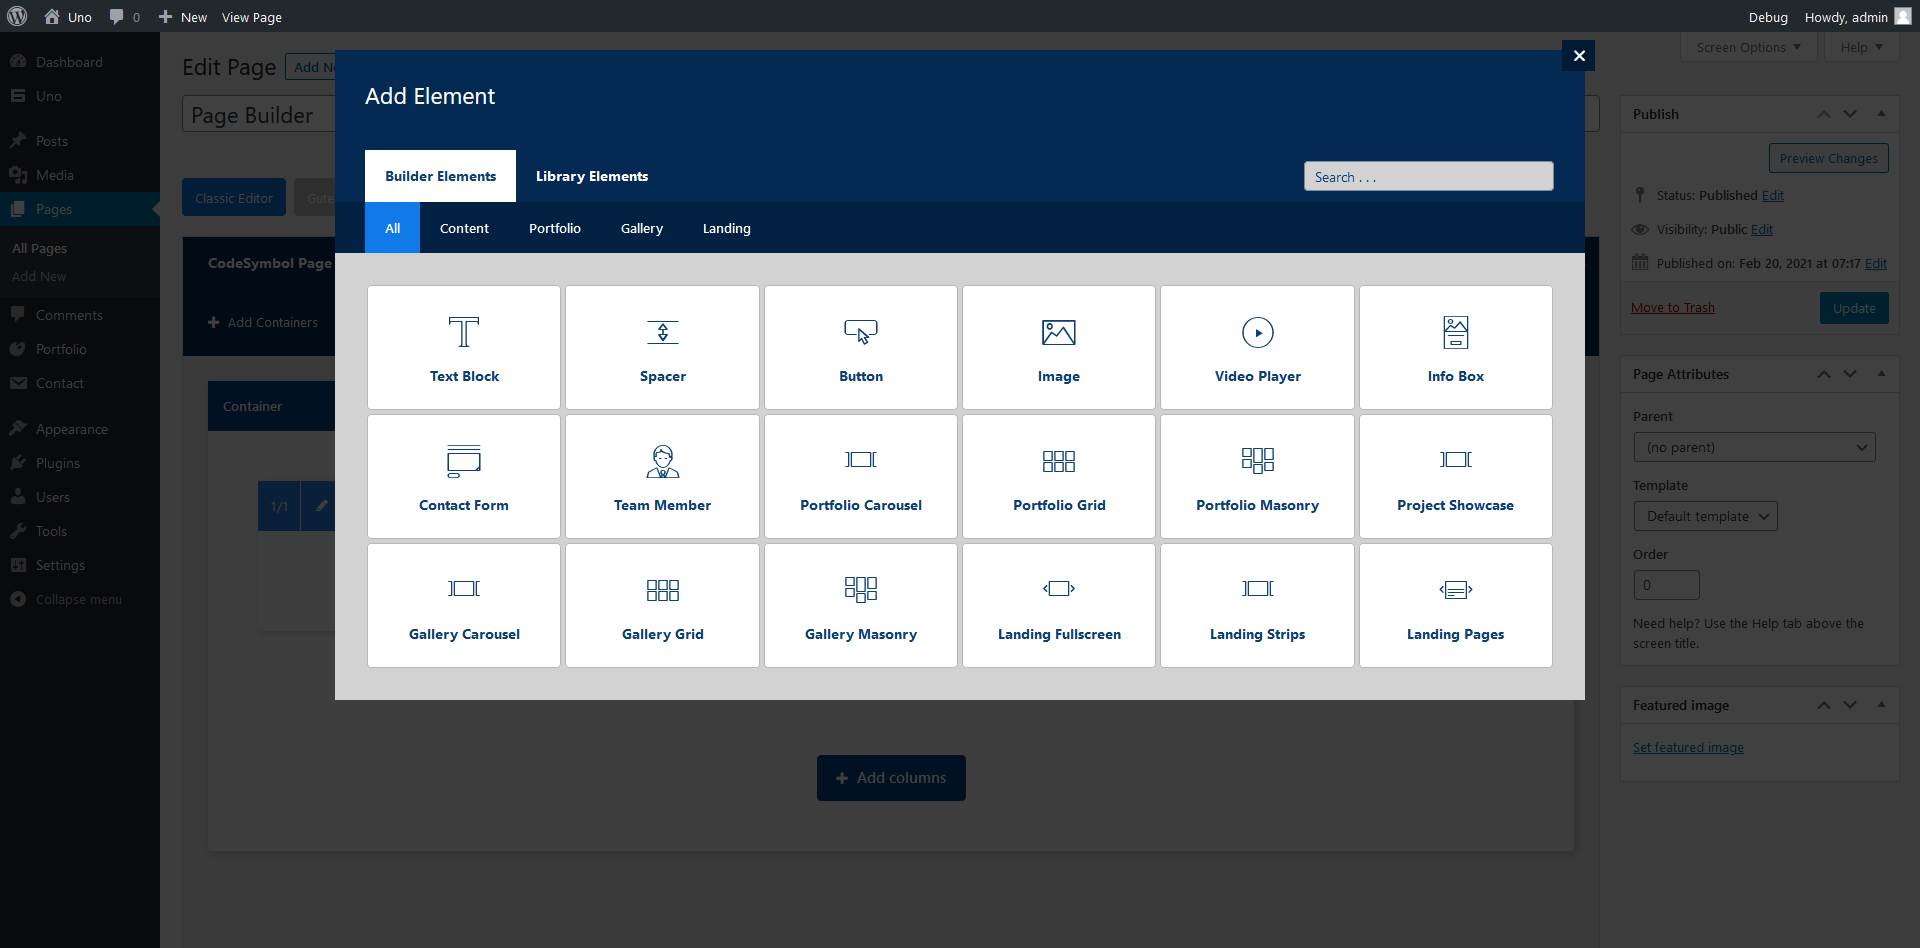
- Element
- Text Block
- Spacer
- Button
- Image
- Video Player
- Info Box
- Contact Form
- Team Member
- Portfolio Carousel
- Portfolio Grid
- Portfolio Masonry
- Portfolio Showcase
- Gallery Carousel
- Gallery Grid
- Gallery Masonry
- Landing Fullscreen
- Landing Strips
- Landing Pages
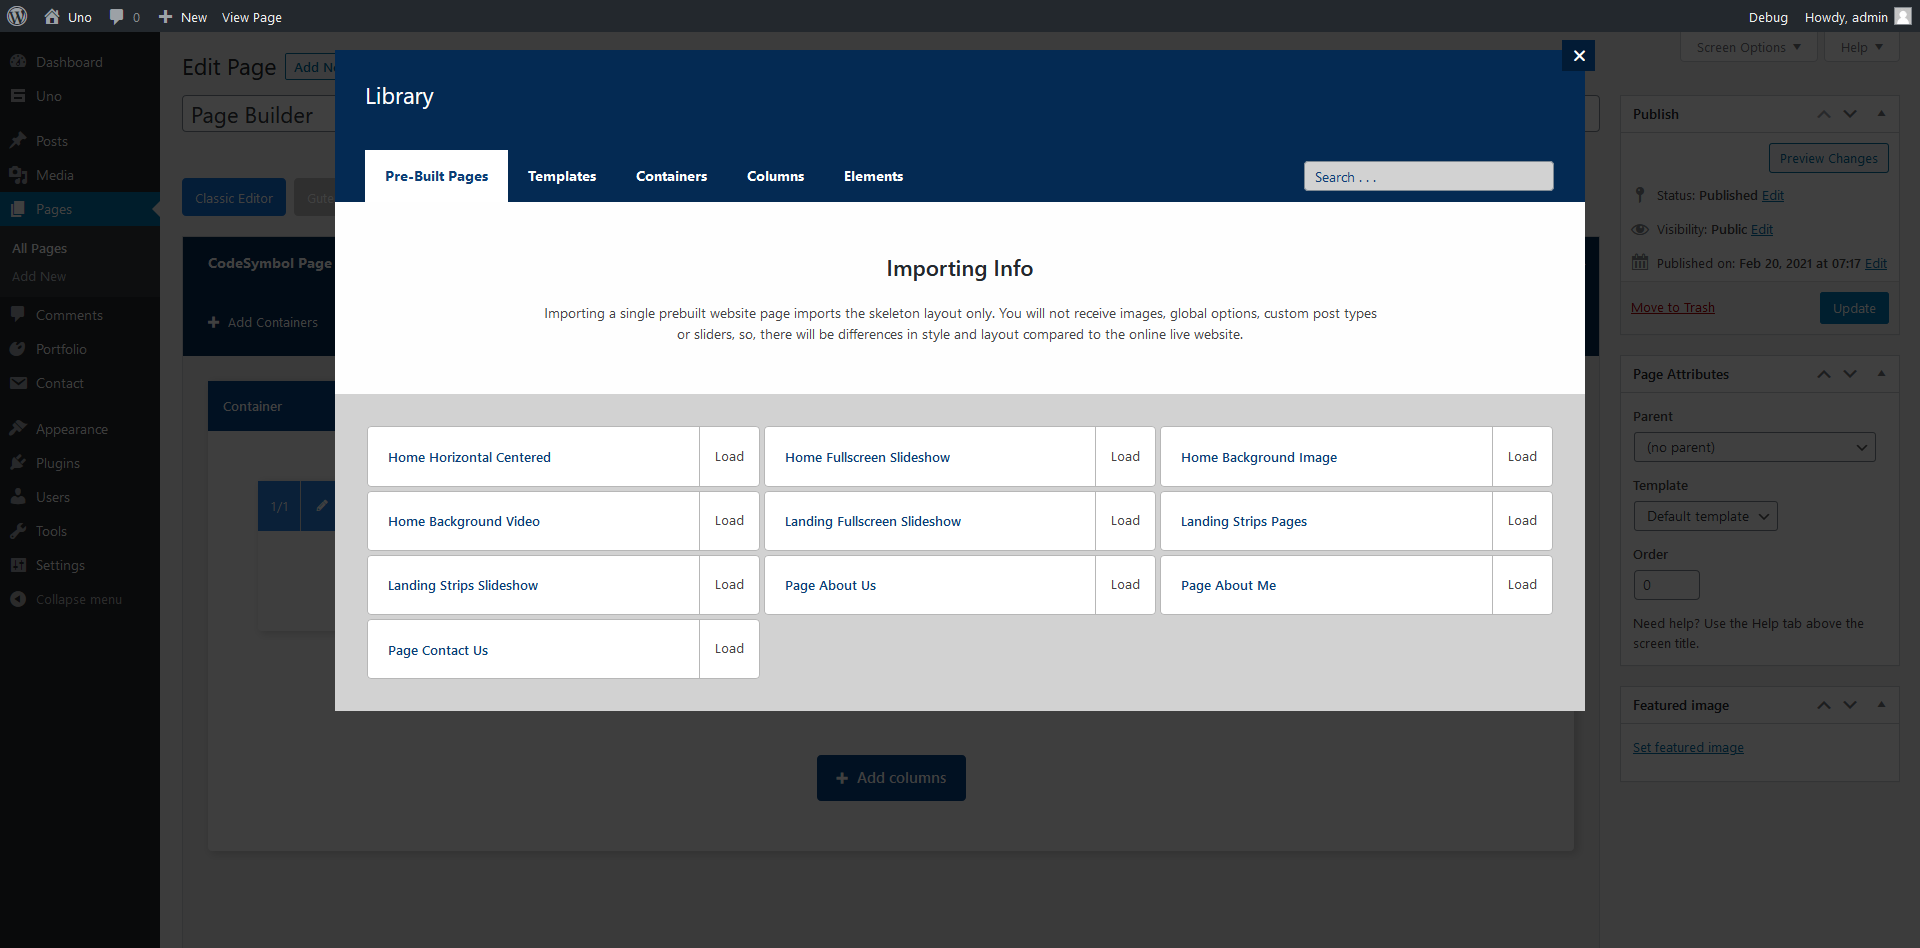
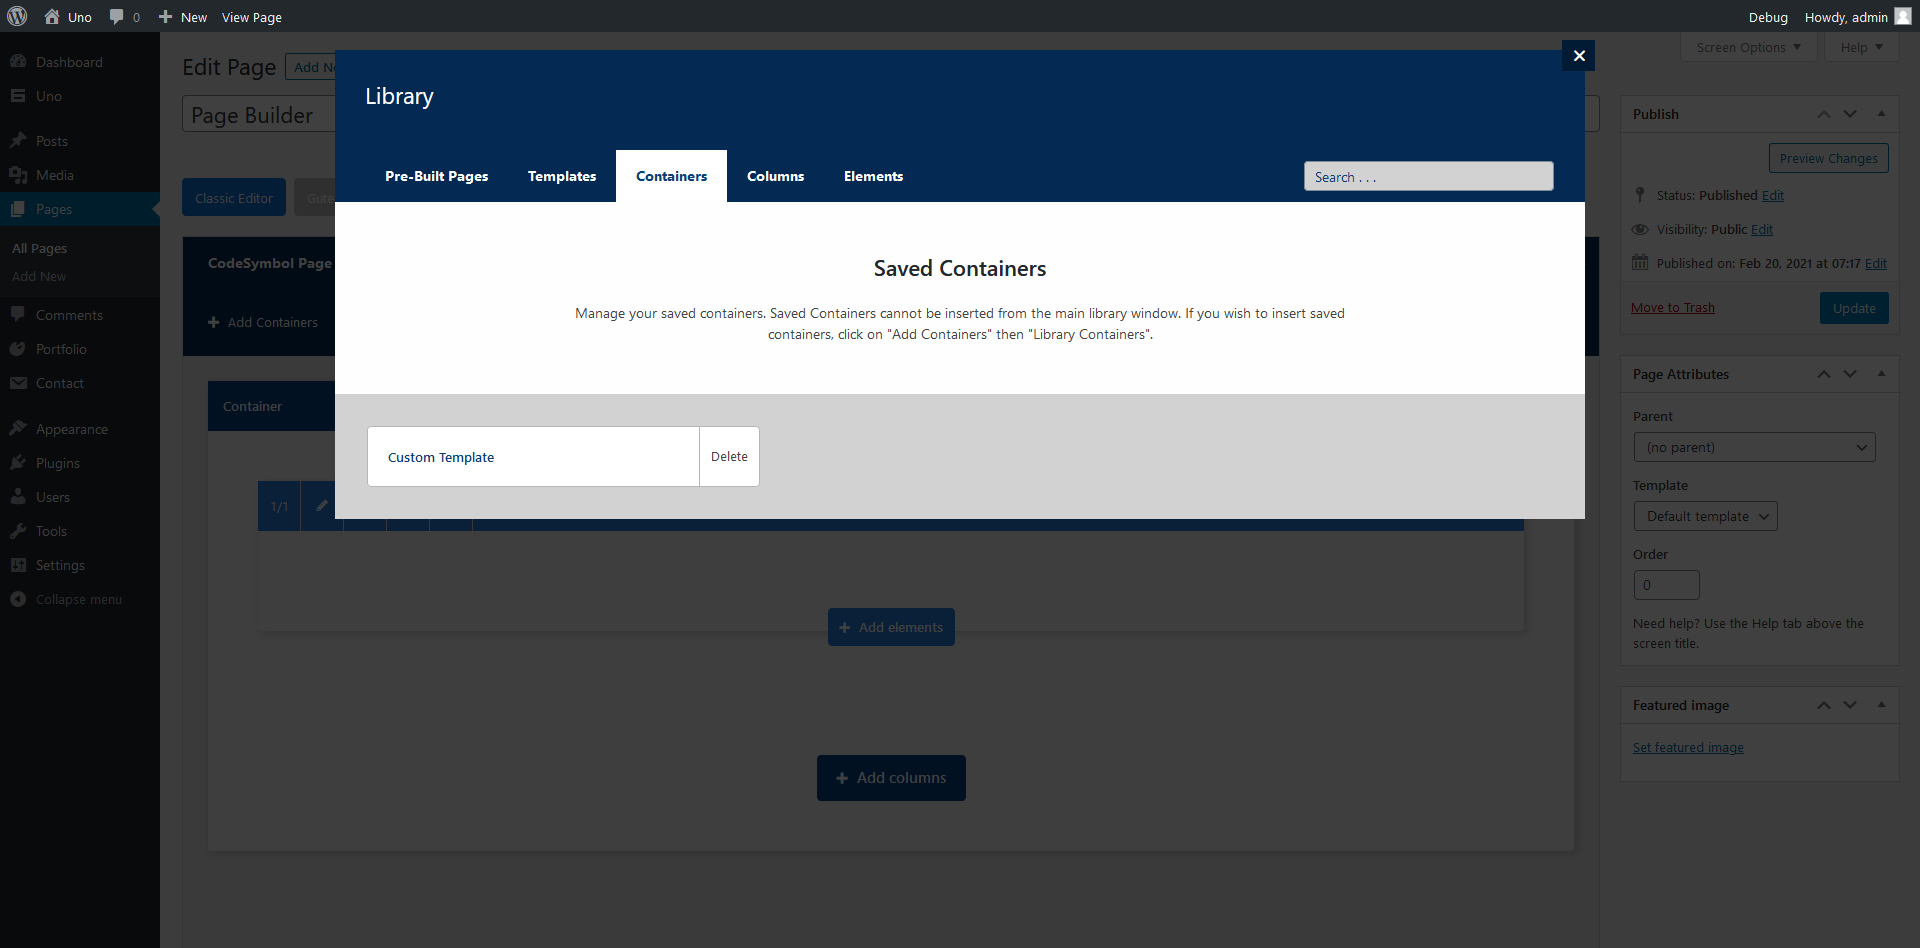
Library
Page builder library allows you to save items for later use, instead of building the same item over and over, saving it to the library saves you the time and energy.
You can save a full page, container, column, and element to the library.
You can also find pre-built pages already saved, available for use in a click of a button.
Page Options
In this section we'll explore what are the available options for pages:
- Page Attributes: this section allows you to choose the page's parent, template and order.
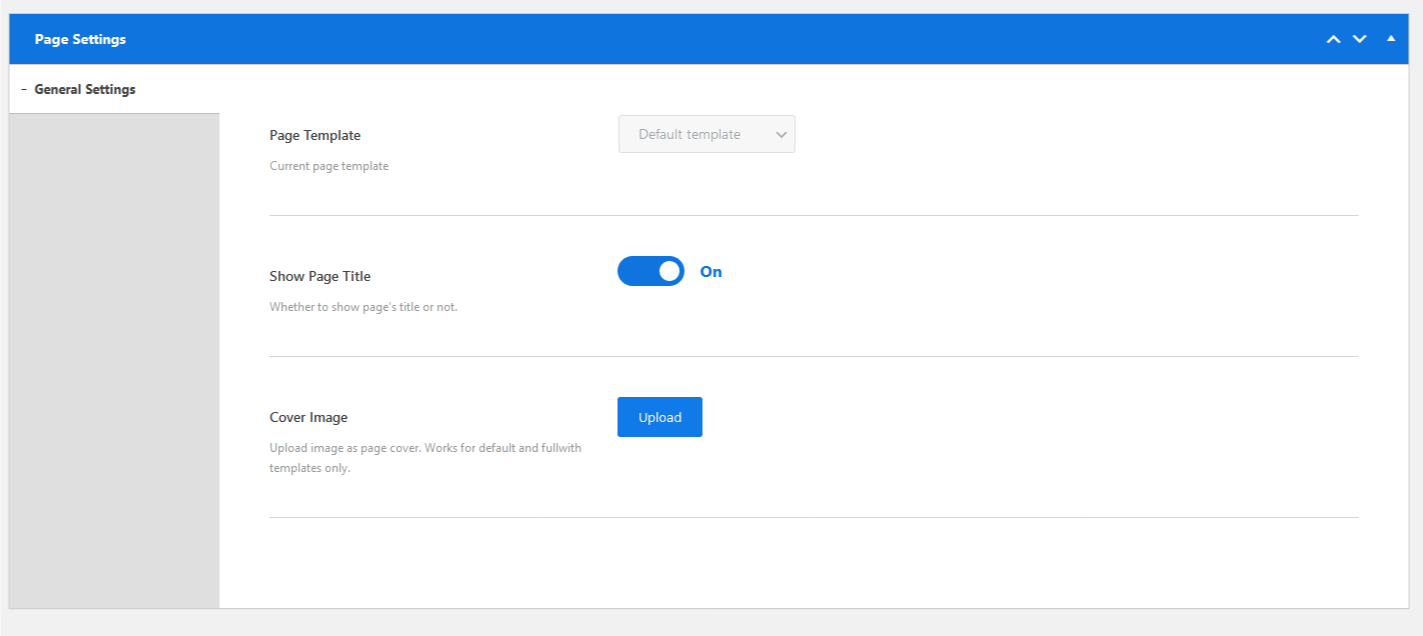
- Page Settings
- Page Title: Whether to show or hide page's title. Works for (Default, Fullwidth) templates only.
- Page Cover: Whether to add a cover image for the page. Works for (Default, Fullwidth) templates only.
- Background Image: Whether to add a background image for the page. Works for (Fullscreen) template only.
- Overflow Content: Whether to show overflowed content outside the page's container. Works for (Fullscreen) template only.
Here are some examples from our demo that might help understand page's options:
- Page Template (Default): About Us, About Me, Contact Us
- Page Template (Fullscreen): Home Background Image, Portfolio Horizontal Centered, Portfolio Horizontal Fullscreen, Portfolio Horizontal Scroll, Portfolio Strips, Gallery Kenburns Slideshow
- Page Template (Fullwidth): Portfolio Grid, Portfolio Masonry, Gallery Grid, Gallery Masonry
- Page Template (Landing): Landing Fullscreen Slideshow, Landing Strips Slideshow, Landing Strips Pages

Post Options
In this section we'll explore what are the available options for posts:
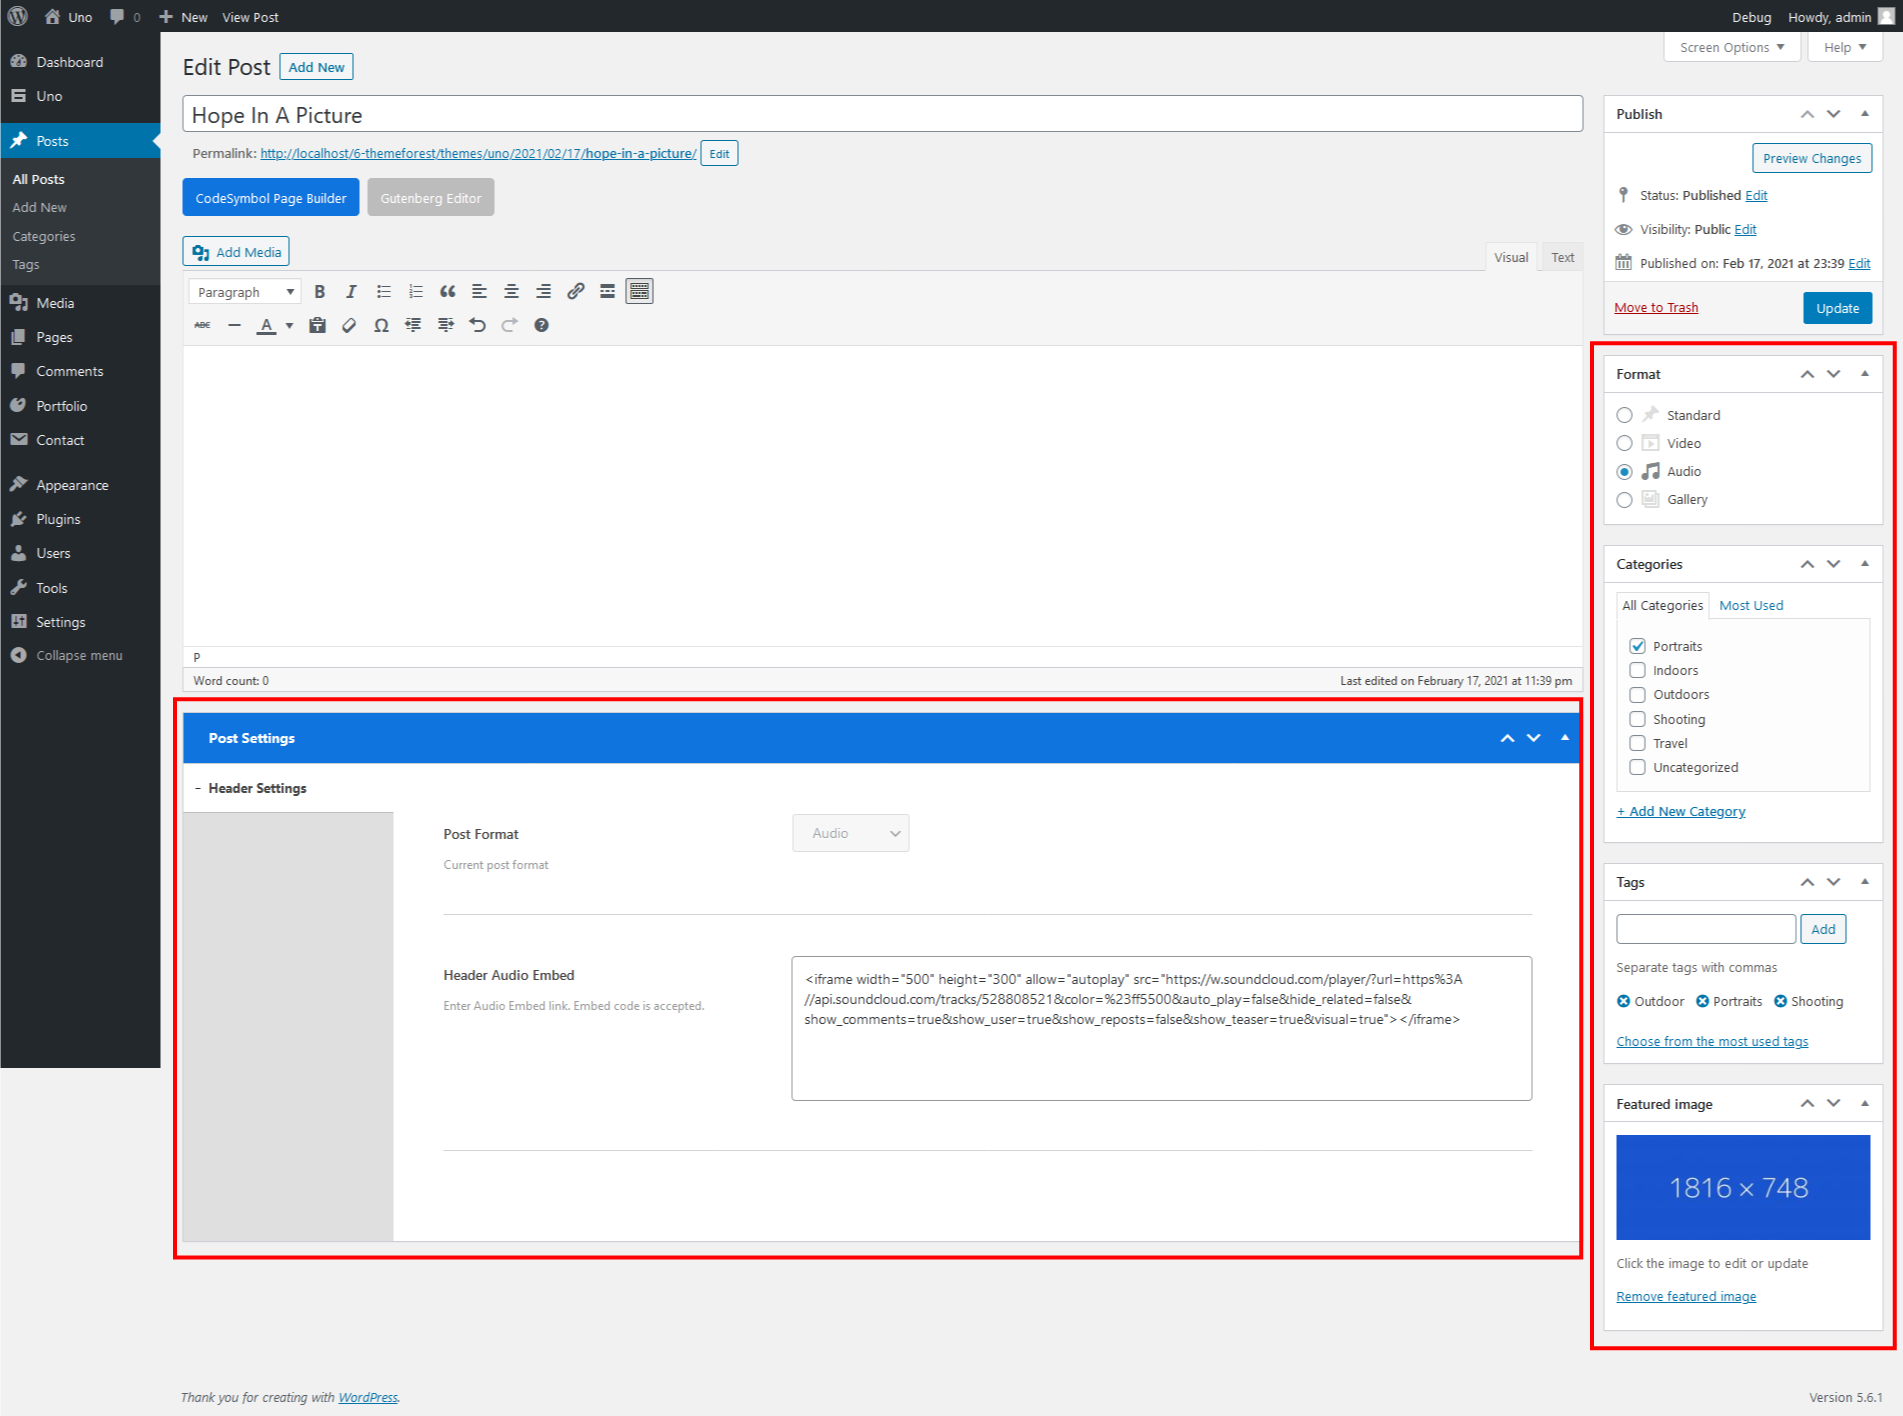
- Post Attributes: this section allows you to choose the post's featured image, tags, categories and template.
- Post Settings
- Header Image: Post's header image cover shown when viewing the post. Works only when "Standard" post's template is selected.
- Header Video URL: Post's header video cover shown when viewing the post. Works only when "Video" post's template is selected. Accepts Youtube and Vimeo link only.
- Header Audio Embed: Post's header audio cover shown when viewing the post. Works only when "Audio" post's template is selected. Accepts embed code only.
- Header Gallery: Post's header gallery slideshow cover shown when viewing the post. Works only when "Gallery" post's template is selected.
Portfolio Options
In this section we'll explore what are the available options for portfolio projects:
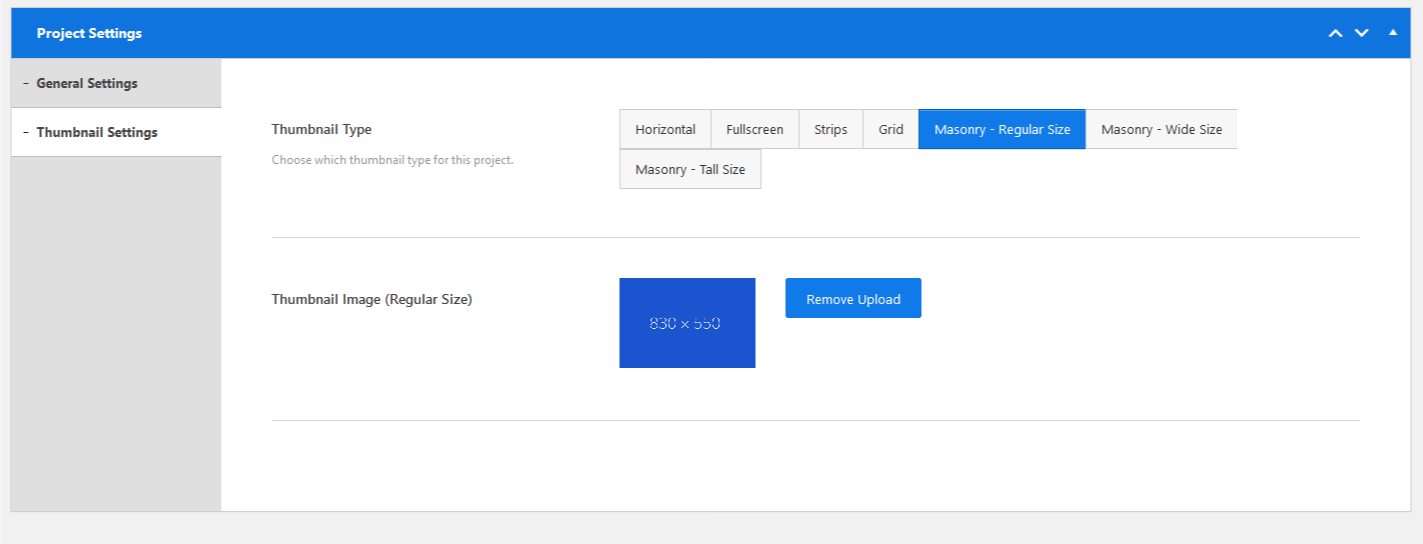
- Project Attributes: this section allows you to choose the project's featured image, categories and template.
- Project Settings
- Cover Type: Project's header cover shown when viewing the project page. Works only when "Default" project's template is selected. Accepts image, slideshow, and video.
- Thumbnail Type: Project's thumbnail shown when viewing a portfolio page having this project in it. Accept horizontal, fullscreen, strips, grid, masonry regular, masonry wide, masonry tall.


Help
All of our products include a 6 months support period and free lifetime theme updates. Once the 6-month support period ends, you have an option to extend support coverage for an additional 6 or 12 months. If you choose to not extend your support, you will no longer be able to receive technical assistance, but you still have access to our online documentation.
Support is limited to questions regarding the theme’s features or problems with the theme. We are not able to provide support for code customizations or third-party plugins. If you need help with anything other than minor customizations of your theme, we suggest enlisting the help of a developer.
Our support covers theme set up, theme-related questions, and bugs or other issues that may occur when using the theme. Customization can be any work you need done to the theme that does not fall within the scope of our support agreement. In most cases, this is anything falling outside of the options the theme offers. We do not provide customization services or freelance support to incorporate modifications in our themes.
What's included in item support?
During the product support period, the author is expected to be available to:
- Answer specific technical questions about the features and functionality of the theme.
- Provide guidance on how the theme is designed to function.
- Help you with issues related to using the theme and getting optimum value from its functionality.
- Answer questions about third party plugin functionality as it relates to the theme.
- Product updates to fix bugs, ensure ongoing compatibility, and resolve security vulnerabilities.
What's Not included in item support?
During the product support period, the author is not expected to:
- Modify or extend the theme beyond the original features seen in the demo.
- Install the theme.
- Address issues regarding your hosting or server environment; please check with your provider.
- Address third party assets.
You will find a complete description of these support policies in ThemeForest's Support Policy.
Extra Customisations
Please follow this article if you are interested in extra customisations that are not part of the preset options of the Uno Wordpress Theme or extra freelance services.
According to the Envato license terms this Help-Center is running to support possible bug fixes and installation problems that may arise with our softwares. Help with theme modifications is beyond the scope of this service and it's not part of the purchase package.
We are defining customisations all the variations that are not part of the preset options of the admin panels and any HTML, PHP, JavaScript and CSS files modifications which will alter the native look and functionalities of our products.
If you need extra qualified customisations or modifications with your Uno theme these are our suggestions:
- Codeable: Do you require WordPress theme design, installations/integrations, custom plugin development, or theme modifications? Head over to Codeable to find the best WordPress experts to give you a free estimate.
- WP Kraken: Do you need help with your WordPress set-up, extra plugins installation or Server configuration? Leave it to the experts. WP Kraken is the 100% Money Back Guarantee solution for your WordPress extra services.
Updates & Fixes
Here you can view what has been changed/fixed after a theme update:
Version 2.0.13
-
Fixes:
- New: WordPress v6.4.3 compatible.
- Fixed: Reduxframework PHP 8.1 warnings.
Version 2.0.12
-
Fixes:
- WordPress v6.4.2 compatible.
- Fixed: Lowered CodeSymbol Demo Importer required "PHP time limit" from 120 to 59 seconds.
Version 2.0.11
-
Fixes:
- Fixed: WordPress v6.1.1 compatible.
- Fixed: Lowered CodeSymbol Demo Importer required "PHP time limit" from 180 to 120 seconds.
Version 2.0.10
-
Fixes:
- Fixed: Decreased CodeSymbol Demo Importer maximum PHP vars allowed.
Version 2.0.9
-
Fixes:
- Fixed: CodeSymbol Page Builder not loading correctly.
Version 2.0.8
-
Fixes:
- Fixed: Text Block HTML edits not being saved.
Version 2.0.7
-
New:
- New: Now the user can deregister his purchase code registered with old domains.
-
Fixes:
- Fixed: Text Block HTML edits not being saved.
- Fixed: Admin bar flowing over the menu when logged in.
- Fixed: Page Builder responsive bug.
- Fixed: Logo height increased.
Version 2.0.6
-
Fixes:
- Fixed: Footer not visible on iPhone & iPad.
- Fixed: PHP memory limit requirement reduced to 128 MB for Demo Importer.
- Fixed: Gallery filters overflow.
Version 2.0.5
-
Fixes:
- Fixed: WordPress v5.8.1 compatibility issues.
Version 2.0.4
-
Fixes:
- Fixed: Page Builder columns css bug.
- Fixed: Theme Registeration bug.
Version 2.0.3
-
New:
- New: Custom color for anchor links.
-
Fixes:
- Fixed: Portfolio & Gallery filters not being responsive.
- Fixed: Portfolio & Gallery image caption not hiding if empty.
Version 2.0.2
-
New:
- New: Page Builder: Project showcase - info box supports new line.
-
Fixes:
- Fixed: Gallery lightbox showing unfiltered images.
- Fixed: Portfolio single 1 gallery lightbox bug.
Version 2.0.1
- New: Custom Logo link for Landing Slideshow.
Version 2.0
-
New:
- New: WordPress v5.6.1 support.
- New: Page Builder.
- New: Theme Dashboard System.
- New: Theme Registeration System.
- New: Demo Importer.
- New: Theme Plugins.
- New: Custom Post Types.
- New: Metaboxes.
- New: Documentation.
-
Fixes:
- Fixed: Gray squares showing on top of images.
- Fixed: WP Query errors in both Backend and Frontend.
- Fixed: Alt and Figure caption not showing for images.
-
Removed:
- Removed: Albums Custom Post Type.
- Removed: Testimonials Custom Post Type.
- Removed: Teams Custom Post Type.
- Removed: Shortcodes Plugin.
Version 1.0
- Official Publish.
Contact Us
If you have any questions that are beyond the scope of this help file, please feel free to email us from our Profile Page. Please don’t forget to mention your purchase code in your message.
Or
You can send a message to us via the Uno Theme comments section on ThemeForest. At the bottom of the comments page you will find a "Add a comment" form to send a message.